
Developer tools are a minefield. We’re so picky about the tools we use and require a high quality or don’t even consider them. You have an ingrained workflow if you’re like me, you behave like a robot when starting your programming.
Being open and willing to improve your developer life is an essential skill. There’s always room for improvement and another shortcut to learn. In hapi, you’ve certainly seen the „fuzzy“ default Internal Server Error for bad implementations. You have to look at the command line to get a grasp on the actual issue.
We’ve developed hapi-dev-errors to skip the command line lookup. You’ll increase your productivity by using this elegant and expressive error view in the browser:

hapi Series Overview
- What You’ll Build
- Prepare Your Project: Stack & Structure
- Environment Variables and Storing Secrets
- Set Up MongoDB and Connect With Mongoose
- Sending Emails in Node.js
- Load the User’s Profile Picture From Gravatar Using Virtuals in Mongoose
- Implement a User Profile Editing Screen
- Generate a Username in Mongoose Middleware
- Displaying Seasons and Episodes for TV Shows with Mongoose Relationship Population
- Implementing Pagination for Movies
- Implement a Watchlist
- Create a Full Text Search with MongoDB
- Create a REST API with JSON Endpoints
- Update Mongoose Models for JSON Responses
- API Pagination for TV Shows
- Customize API Endpoints with Query Parameters
- Always Throw and Handle API Validation Errors
- Advanced API Validation With Custom Errors
- Create an API Documentation with Swagger
- Customize Your Swagger API Documentation URL
- Describe Endpoint Details in Your Swagger API Documentation
- 10 Tips on API Testing With Postman
- JWT Authentication in Swagger API Documentation
- API Versioning with Request Headers
- API Login With Username and Password to Generate a JWT
- JWT Authentication and Private API Endpoints
- Refresh Tokens With JWT Authentication
- Create a JWT Utility
- JWT Refresh Token for Multiple Devices
- Check Refresh Token in Authentication Strategy
- Rate Limit Your Refresh Token API Endpoint
- How to Revoke a JWT
- Invalidate JWTs With Blacklists
- JWT Logout (Part 1/2)
- JWT “Immediate” Logout (Part 2/2)
- A Better Place to Invalidate Tokens
- How to Switch the JWT Signing Algorithm
- Roll Your Own Refresh Token Authentication Scheme
- JWT Claims 101
- Use JWT With Asymmetric Signatures (RS256 & Co.)
- Encrypt the JWT Payload (The Simple Way)
- Increase JWT Security Beyond the Signature
- Unsigned JSON Web Tokens (Unsecured JWS)
- JWK and JWKS Overview
- Provide a JWKS API Endpoint
- Create a JWK from a Shared Secret
- JWT Verification via JWKS API Endpoint
- What is JOSE in JWT
- Encrypt a JWT (the JWE Way)
- Authenticate Encrypted JWTs (JWE)
- Encrypted and Signed JWT (Nested JWT)
- Bringing Back JWT Decoding and Authentication
- Bringing Back JWT Claims in the JWT Payload
- Basic Authentication With Username and Password
- Authentication and Remember Me Using Cookies
- How to Set a Default Authentication Strategy
- Define Multiple Authentication Strategies for a Route
- Restrict User Access With Scopes
- Show „Insufficient Scope“ View for Routes With Restricted Access
- Access Restriction With Dynamic and Advanced Scopes
- hapi - How to Fix „unknown authentication strategy“
- Authenticate with GitHub And Remember the Login
- Authenticate with GitLab And Remember the User
- How to Combine Bell With Another Authentication Strategy
- Custom OAuth Bell Strategy to Connect With any Server
- Redirect to Previous Page After Login
- How to Implement a Complete Sign Up Flow With Email and Password
- How to Implement a Complete Login Flow
- Implement a Password-Reset Flow
- Views in hapi 9 (and above)
- How to Render and Reply Views
- How to Reply and Render Pug Views (Using Pug 2.0)
- How to Create a Dynamic Handlebars Layout Template
- Create and Use Handlebars Partial Views
- Create and Use Custom Handlebars Helpers
- Specify a Different Handlebars Layout for a Specific View
- How to Create Jade-Like Layout Blocks in Handlebars
- Use Vue.js Mustache Tags in Handlebars Templates
- How to Use Multiple Handlebars Layouts
- Extend Your Server Functionality With Plugins
- Create Your Own Custom Plugin
- How to Register Plugins for a Selected Server Instance
- hapi Plugin for Client Geo Location (by Future Studio 🚀)
- Increase Development Speed With Errors in the Browser or as JSON Response
- How to Access and Handle Request Payload
- Access Request Headers
- How to Manage Cookies and HTTP States Across Requests
- Detect and Get the Client IP Address
- How to Upload Files
- Quick Access to Logged In User in Route Handlers
- How to Fix “handler method did not return a value, a promise, or throw an error”
- How to Fix “X must return an error, a takeover response, or a continue signal”
- Query Parameter Validation With Joi
- Path Parameter Validation With Joi
- Request Payload Validation With Joi
- Validate Query and Path Parameters, Payload and Headers All at Once on Your Routes
- Validate Request Headers With Joi
- Reply Custom View for Failed Validations
- Handle Failed Validations and Show Errors Details at Inputs
- How to Fix AssertionError, Cannot validate HEAD or GET requests
Installation
Install hapi-dev-errors with NPM and save the plugin as a project dependency.
# NPM v4 and below
# you’re using NPM shortcuts to (i)nstall and (-S)ave the module as a dependency
npm i -S hapi-dev-errors

# NPM v5 users, please this way
npm i hapi-dev-errors
If you’re more into the Yarn package manager, you can use it as well.
Usage
There’s one important thing: hapi-dev-errors is turned off by default.
You need to explicitly activate it by using the showErrors option and passing a value that evaluates to a boolean true. Our recommendation is to activate the plugin based on your NODE_ENV environment variable. Make sure to not activate it in production.
await server.register({
  plugin: require('hapi-dev-errors'),
  options: {
    showErrors: process.env.NODE_ENV !== 'production'
  }
})
In production environments, hapi uses its default error handling. In case you’re changing the behavior for developer errors with HTTP status code 500, hapi-dev-errors won’t interfere. The request will is passed through without touching it.
Plugin Registration Options
At this point, there are three options that can adjust the plugin’s behavior.
showErrors:(boolean), default:false— activate the plugin by passing a “truthy” value when registering the pluginuseYouch:(boolean), default:false— use Youch to handle and display the error instead of usinghapi-dev-error’s default handlingtemplate:(string), no default — pass the template name that you want to render withreply.view(template, errorData)
await server.register({
    plugin: require('hapi-dev-errors'),
    options: {
        showErrors: process.env.NODE_ENV !== 'production',
        useYouch: true,
        template: 'my-error-template'
    }
})

// do the heavy lifting :)
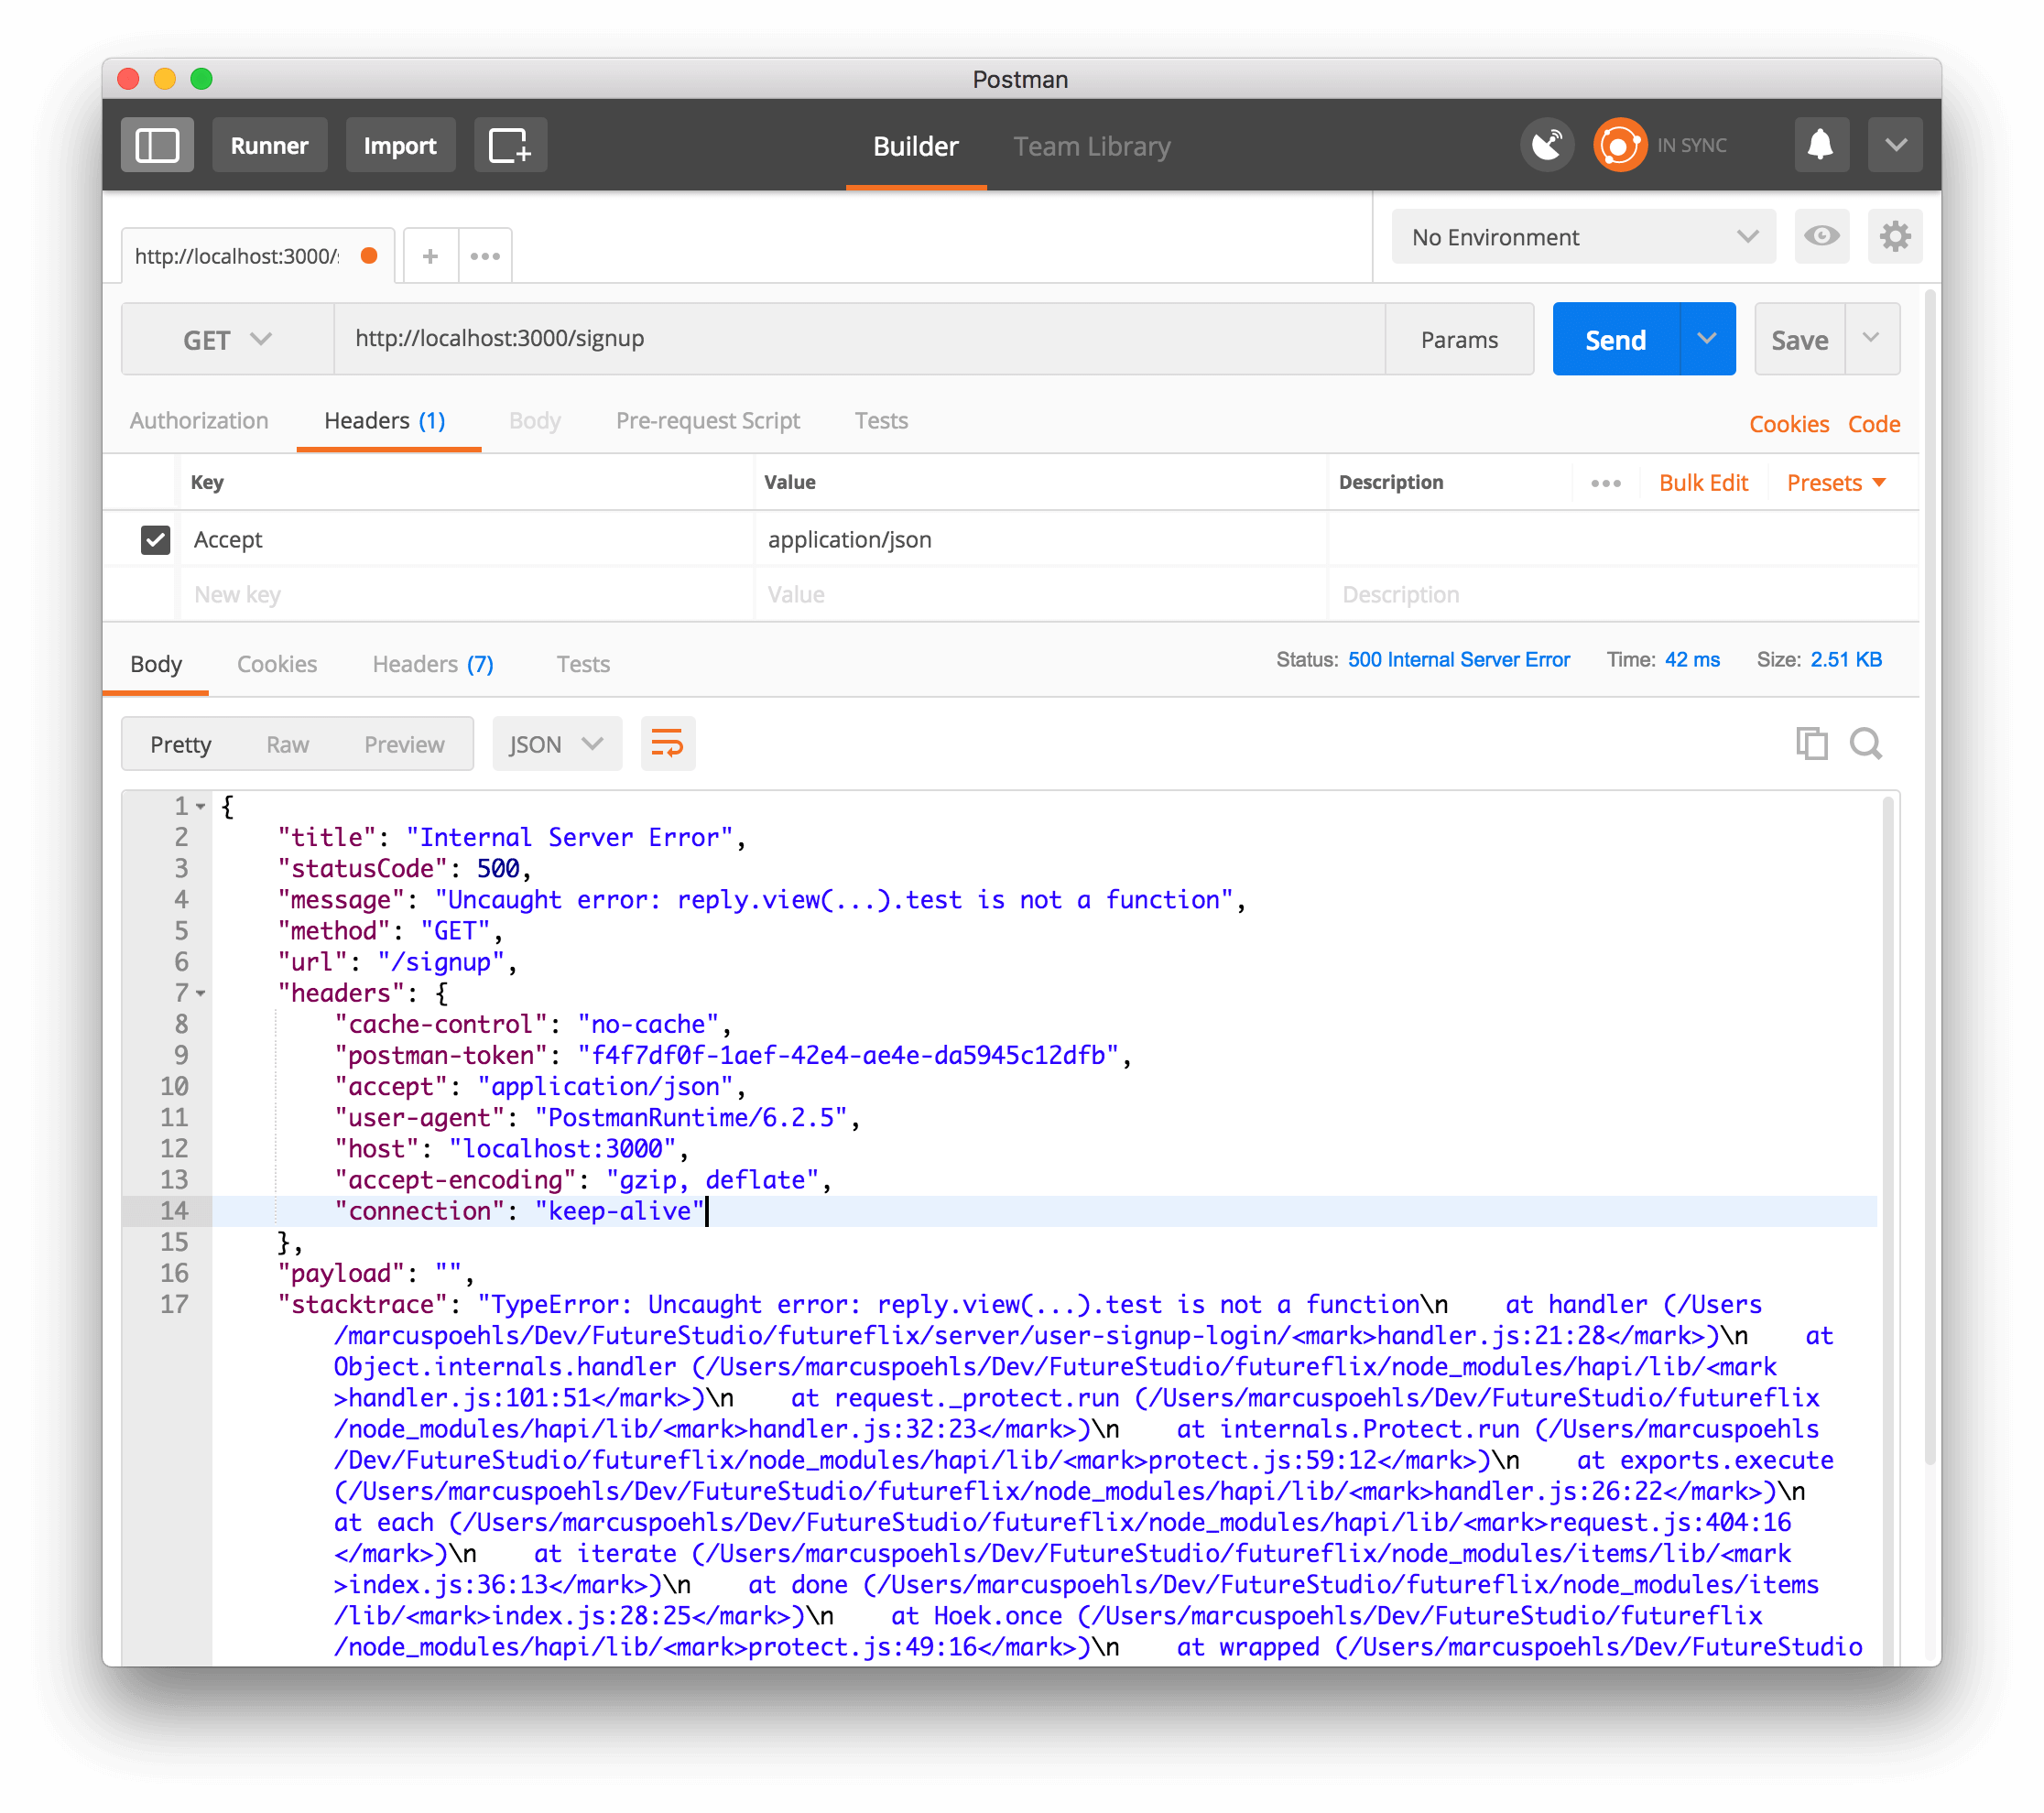
All three options apply to requests that don’t have the Accept header set to application/json. If you’re developing your API with hapi, make sure to set the Accept: application/json HTTP header and you’ll receive a JSON object with error details.
In case you’re activating all three options at the same time, hapi-dev-errors prioritizes the error handling as follows:
- JSON
- template
- Youch
- default error handling
JSON is always the first choice. Your custom template comes next and you can delegate the error handling to Youch if you wish.
Pretty Error Handling
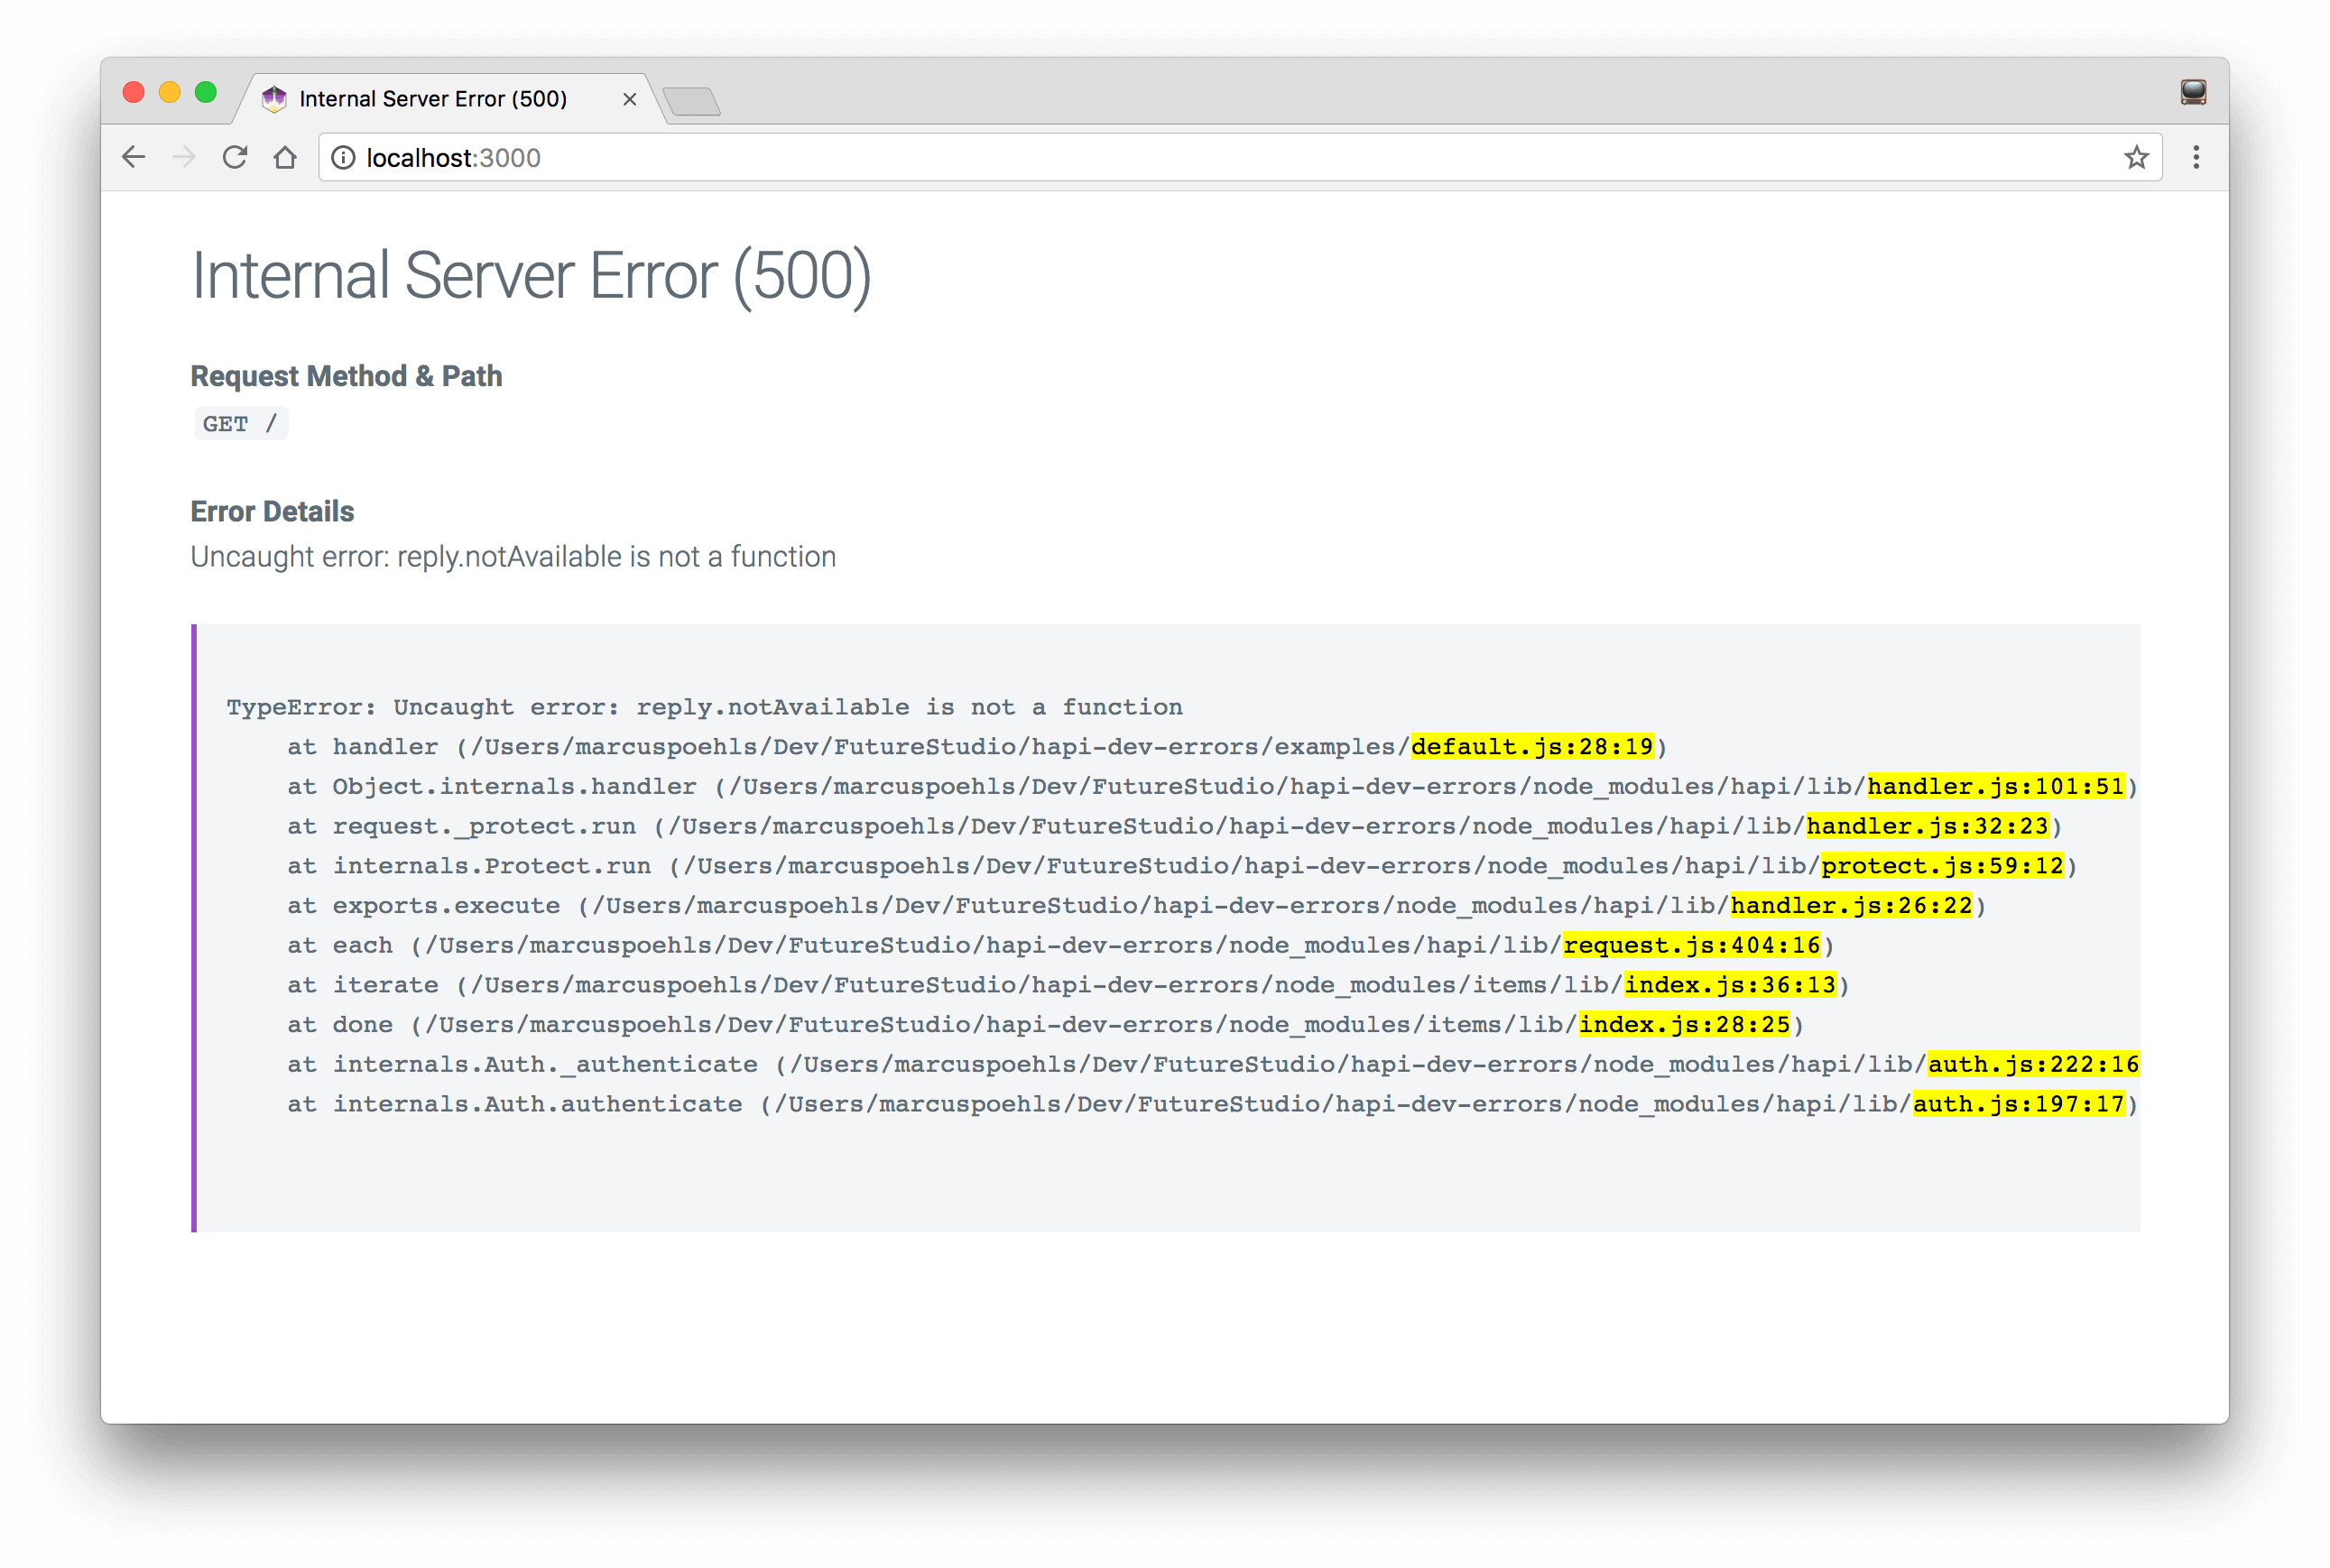
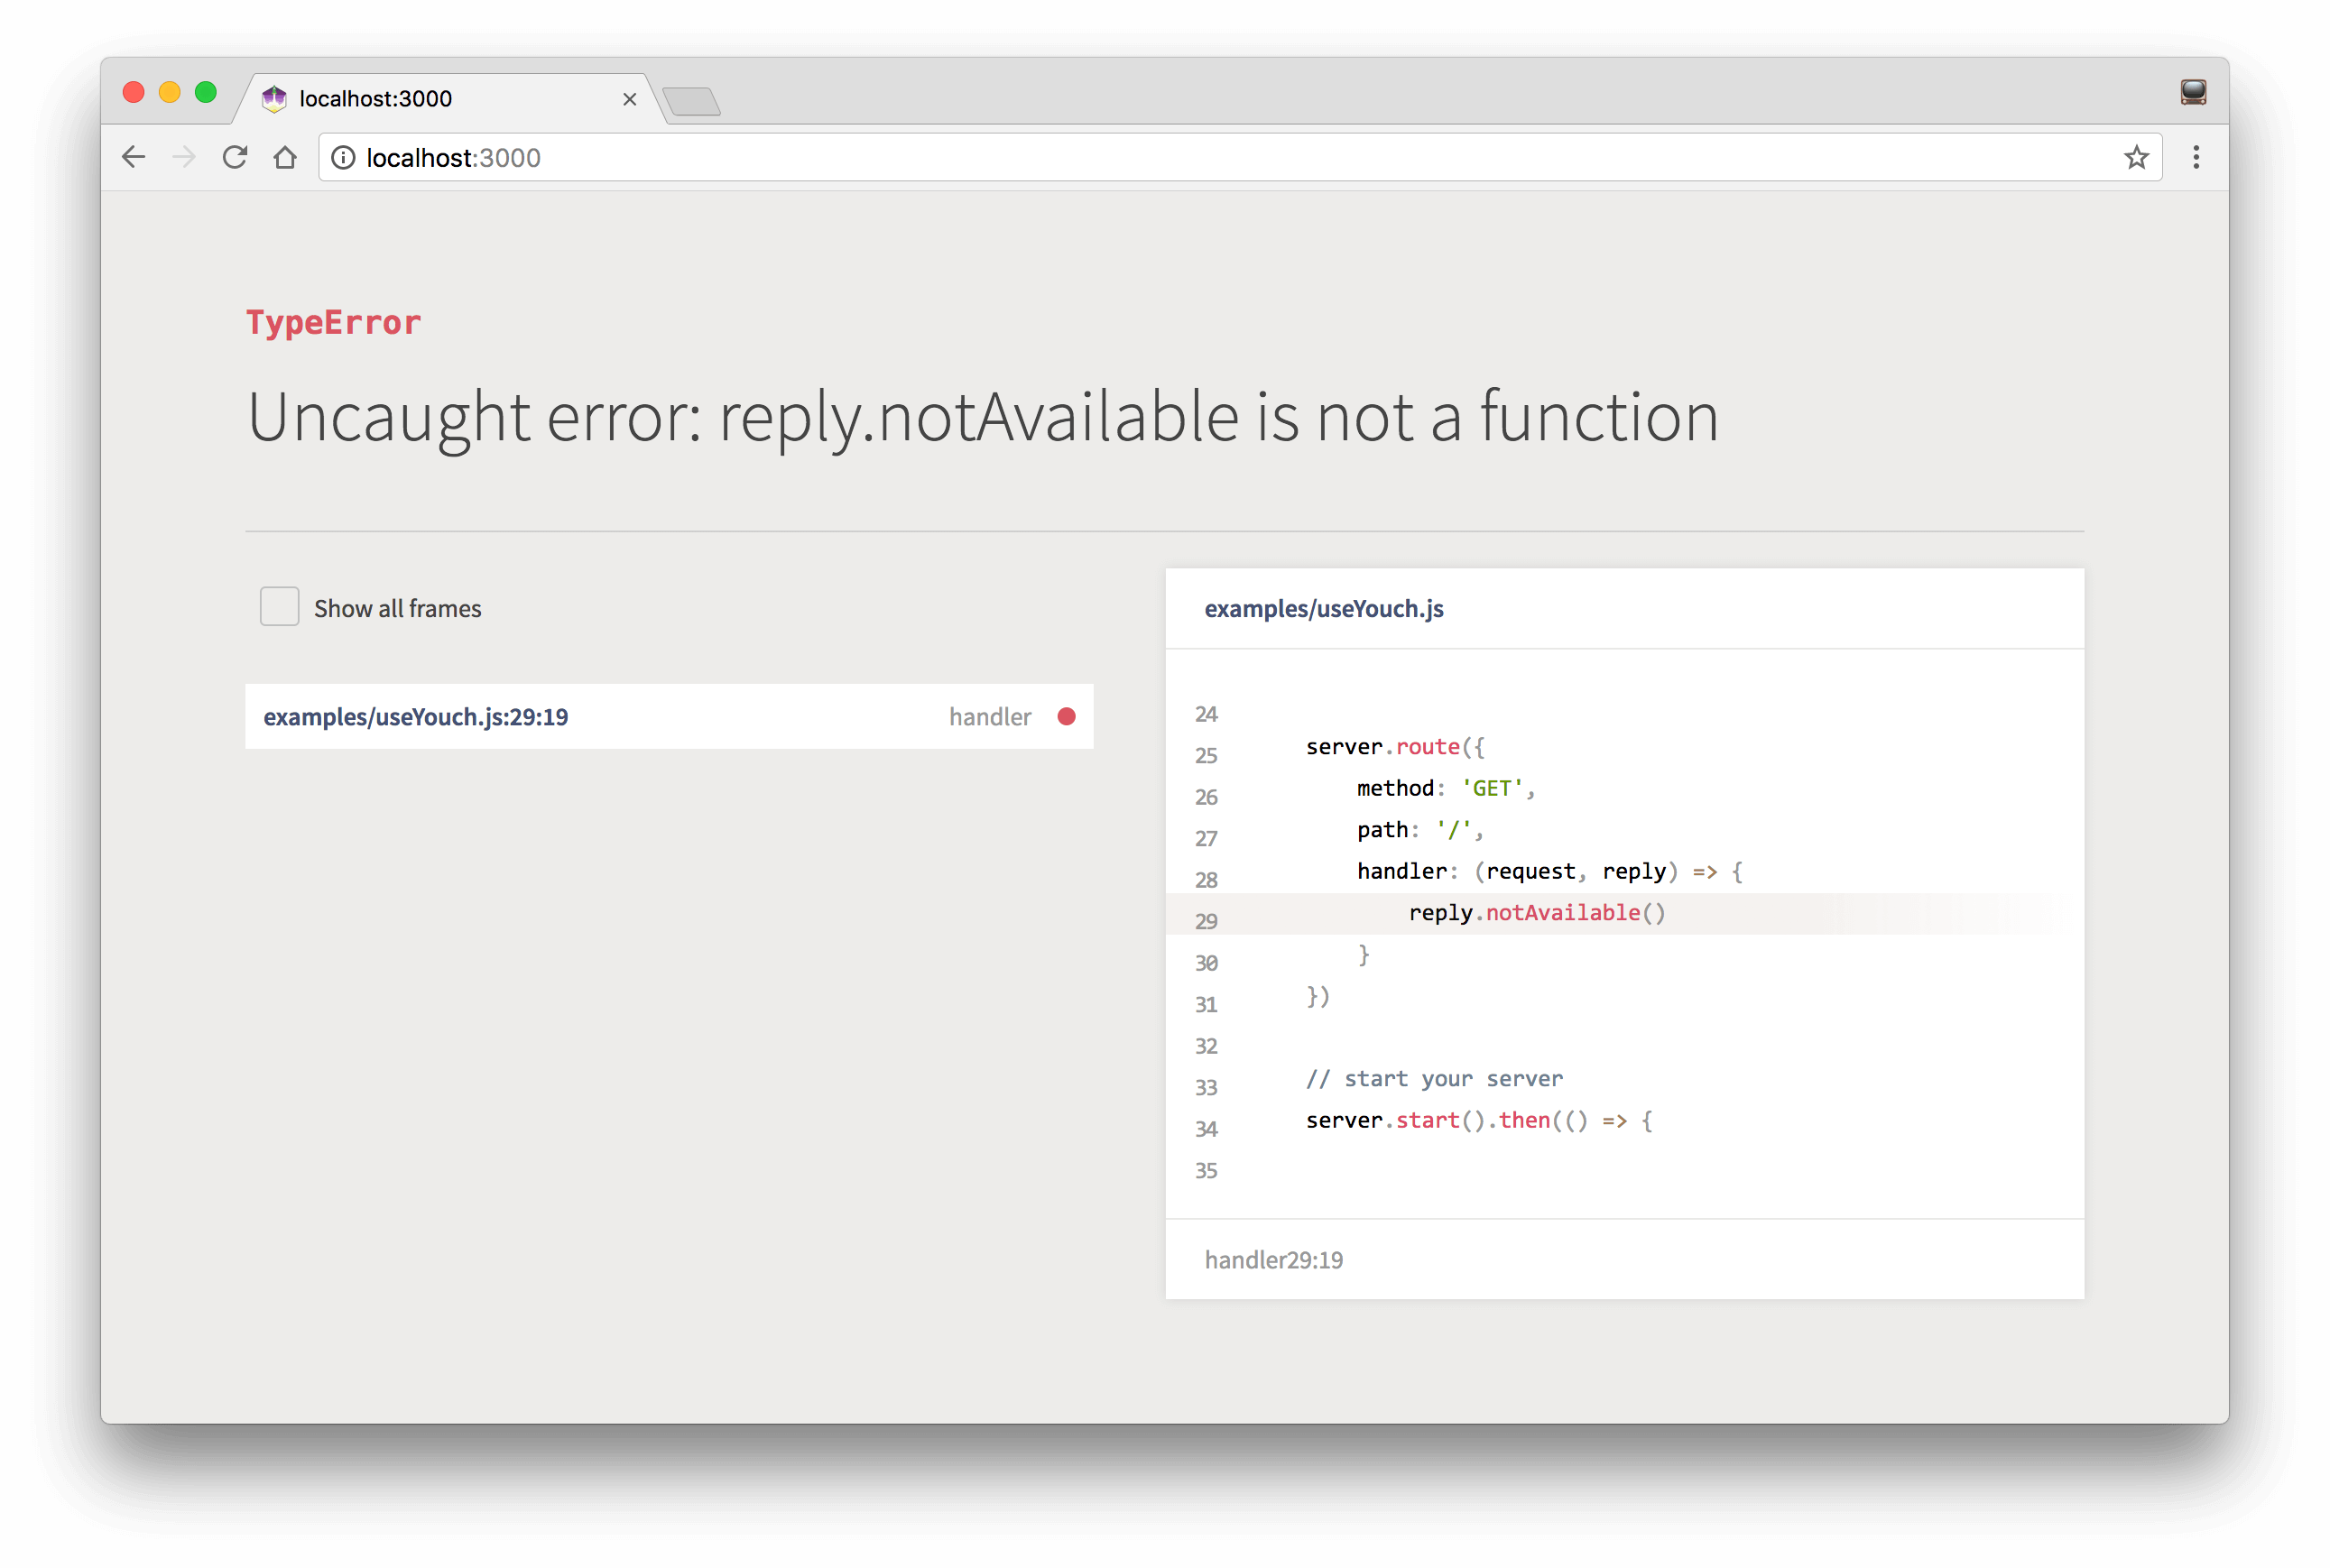
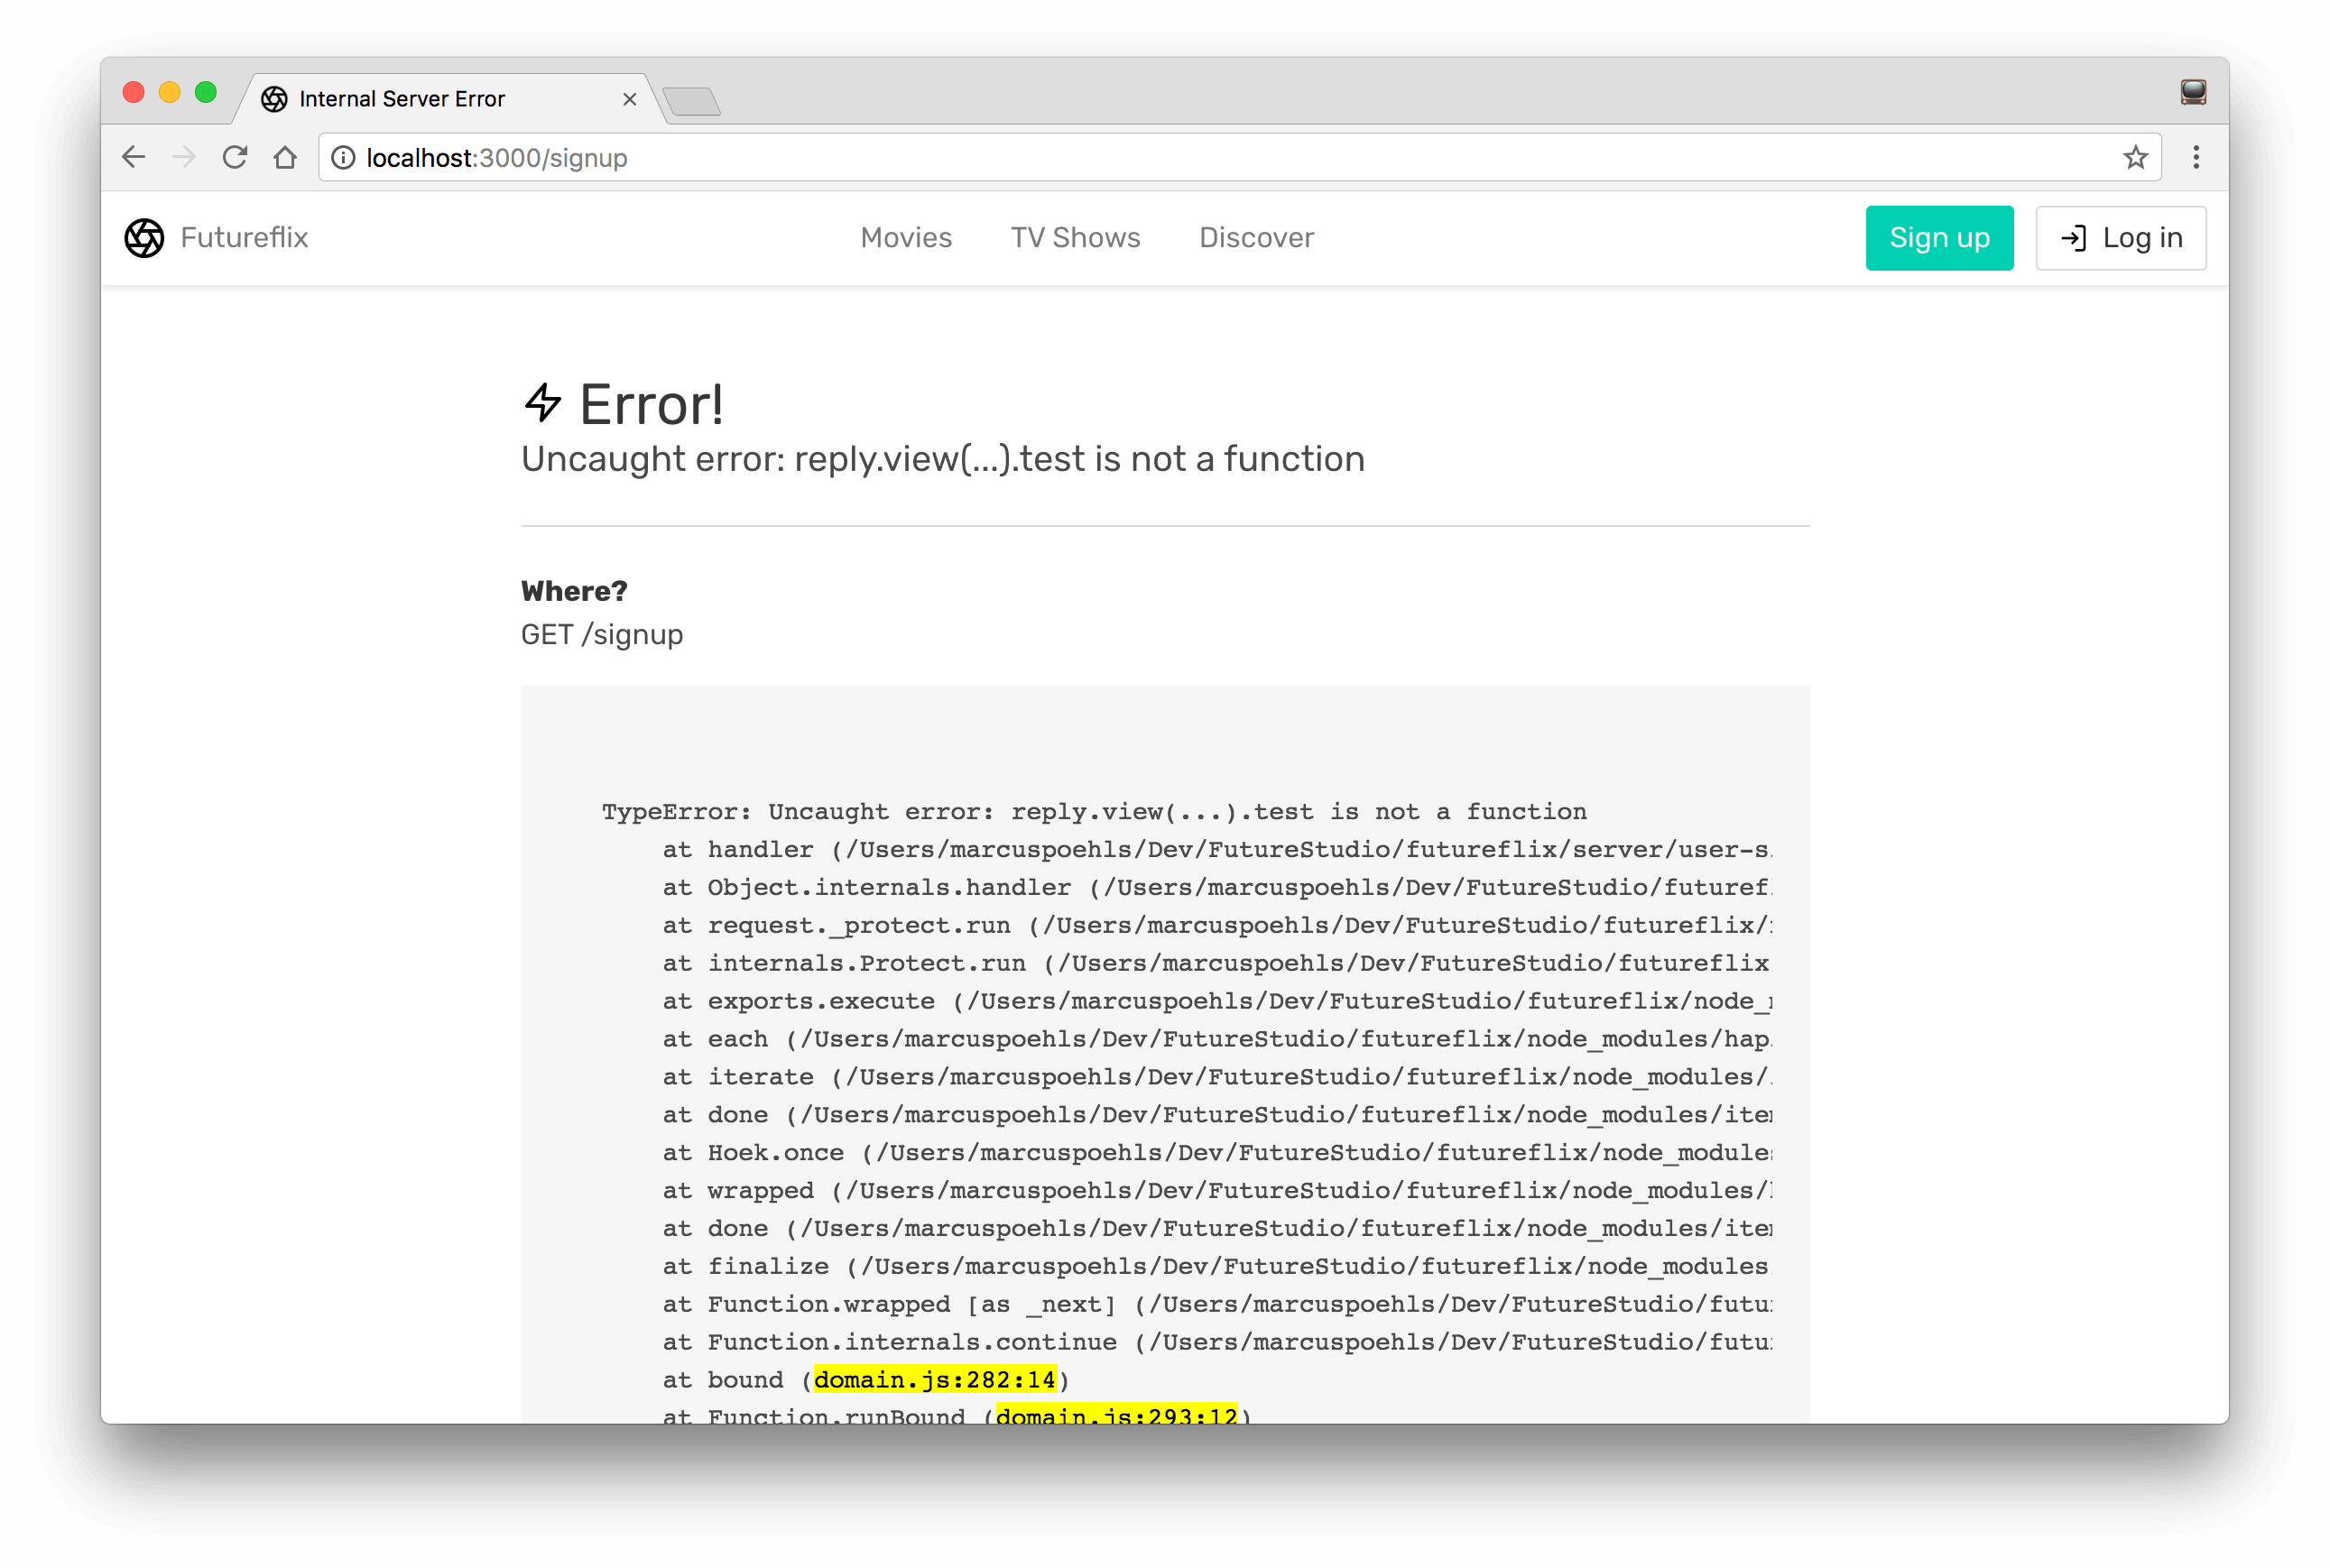
The following pictures illustrate the different views and responses to handle errors.
default hapi-dev-errors template
hapi-dev-errors using Youch
You can also benefit from a custom view template that matches the layout of your web app.
hapi-dev-errors custom view template
In the following section, you’ll find all properties that are available in your custom view.
Before moving on to custom error templates, let’s look at the JSON response from hapi-dev-errors.
hapi-dev-errors JSON response
Use Your Custom Error Template
hapi-dev-errors supports the template option while registering the plugin. Provide a template name to use your personal error template and not the default one shipped with hapi-dev-errors. In case you pass a string value for the template name, the view will be rendered with reply.view(template, errorData).code(500).
Available properties to use in your custom error view:
title: error title likeInternal Server ErrorstatusCode: HTTP response status code (always 500)message: error message, likeUncaught error: reply.view(...).test is not a functionmethod: HTTP request method, likeGETurl: URL request path, like/signupheaders: HTTP request headers object, in key-value formatGETpayload: HTTP request payload, only available for HTTP methods other thanGET, in key-value formatstacktrace: error stacktrace
Depending on the rendering engine, make use of view helper functions or JavaScript snippets to manipulate the data to your needs.
Do You Want a Feature?
Do you miss a feature? Please use the GitHub issues to create your feature request with a short description of your desired addition to this plugin.
Did you find an issue with the plugin itself, please use the GitHub issues as well :)
Outlook
Improve your development flow by showing error details for bad implementations directly in the browser. Besides a nice looking web view, you can get extensive error details as a JSON response by using the Accept: application/json HTTP header.
We appreciate your feedback and would love if you leave us a comment below or tweet on Twitter @futurestud_io.
Make it rock & enjoy coding!
Mentioned Resources
hapi-dev-errorsto return better error details and skip the look at command line to catch the issue- Youch — pretty error reporting in Node.js