Two weeks ago I played around with SCSS (Sassy CSS) because I wanted to do something “new”.
Some of my colleagues said: “Hey that’s cool ! - You’ve to write an article about this immediately or we’ll asSASSinate some kittens”.
I would be a big SASShole if I don’t care about those kittens so I decided to write my really first blog article in the world wide web.
What to expect from this article
- The maybe shortest “What is it?” you’ll ever see
- The difference between Sass and Sassy CSS
- Things you can do with Sass
- The most common way to setup Sass
- The future of CSS
A very short definition
SCSS lets us write a smart syntax near to CSS to master its usual complexity.
You can write SCSS and compile it to CSS before using it in your website.
If you want to read more than you need to know at the moment you can go to the official site.
The difference between Sass and Sassy CSS
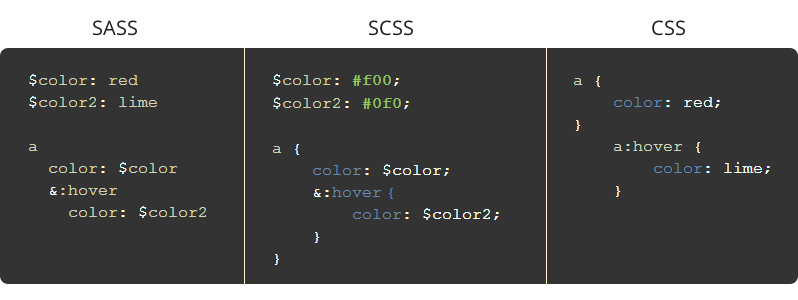 SASS (Syntactically Awesome Style Sheets) was the primary syntax looooong time ago. It used indentation instead of brackets and semicolons.
SCSS is the newer syntax. It's a superset of CSS3's syntax. So every valid CSS3 is valid SCSS as well and it's easier to read for an old school like me. If we talk about Sass today we actually mean SCSS.
Things you can do with Sass
Here are some examples and how it looks like in CSS.
Don't wonder if the code seems very long. Sometimes I used geeky procedures for trivial things just to show what's possible.
Variables
SCSS
// define variables
$red: #f00;
$wk: -webkit-;

// use variables
.link:hover {
    color: $red;
    #{$wk}transition: all 1s ease;
}
CSS
.link:hover {
    color: #f00;
    -webkit-transition: all 1s ease;
}
You can use variables as any part of a CSS rule set (selector, property, value)
Nesting
SCSS
ul {
    padding: 0;
    li {
        list-style: none;
        a {
            color: blue;
            &:hover {
                color: lime;
            }
        }
    }
}
CSS
ul {
   padding: 0;
}

    ul li {
        list-style: none;
    }

        ul li a {
            color: blue;
        }

            ul li a:hover {
                color: lime;
            }
Inheritance
SCSS
%box {
    margin: 2px;
    border: 1px solid black;
}

.greenBox {
    @extend %box;
    border-color: lime;
}

.greenBoxBlueBackground {
    @extend .greenBox;
    background-color: blue;
}
CSS
.greenBox, .greenBoxBlueBackground {
    margin: 2px;
    border: 1px solid black;
}

.greenBox, .greenBoxBlueBackground {
    border-color: lime;
}

.greenBoxBlueBackground {
    background-color: blue;
}
Mixins and functions
SCSS
// this is a mixin
@mixin box($bg-color) {
    background-color: $bg-color;
    // this is a predefined sass-function
    color: complement($bg-color);
}

// this is a self written function
@function myMax($a, $b) {
    // you can use conditionals too
    @if ($a >= $b){
        @return $a;
    }
    @return $b;
}

.redBox {
    // using a mixin
    @include box(red);
    // using a function
    padding: myMax(2em, 1em);
}
CSS
.redBox {
    background-color: red;
    color: cyan;
    padding: 2em;
}
You can find more predefined functions in the sass-docs.
You can find more useful mixins on snipplr or by using a sass-framework.
Modularization
SCSS
// -----this is the content of 'headings.scss'-----
$startSize: 2em;

// that is an array
$headings: h1 h2 h3;

// that is a foreach loop
@each $heading in $headings {
    #{$heading} {
        font-size: $startSize;
    }

    $startSize: $startSize - 0.5em;
}

// -----this is the content of 'all.scss'-----
@import "headings";
CSS
// this is the content of 'all.css'
h1 {
    font-size: 2em;
}

h2 {
    font-size: 1.5em;
}

h3 {
    font-size: 1em;
}
In this blogpost you can find more about modularization and structuring sass projects.
Setup Sass
If you wanna be sassy tonight you can follow this instructions:
Step 1 - Get Ruby
Windows — Install Ruby Tipp: Add Ruby executable to PATH
Linux — Install Ruby via apt package manager
Mac — Ruby is pre-installed
Step 2 - Install Sass
Open your Terminal or Command Prompt and type:
gem install sass
Step 3 - write SCSS, create CSS
Now you can create a .scss file.
Use your favorite console application, go to your project folder and type
sass --watch {filename}.scss
and it will create a {filename}.css related to your SCSS.
While running this script changes on your Sass will be detected and the .css will be created automatically on every save.
If you want to be a real bad SASS you can watch your file like that:
sass --watch {filename}.scss:{filename}.min.css --style compressed
that will create a minified version you can easily bind in your web project.
Using a Framework
If you want to use a big set of useful predefined cross-browser mixins you can use a framework. The most known should be
![]()
(am I the only one who sees a sasshole in that logo?)
you can install it via
gem install compass
this will install SASS/SCSS as well.
Do we really need that?
Well, I'm a bit late to that discussion.
The web doesn't argue about whether to use CSS-preprocessors but which preprocessor is best.
Many reputable brands are already working with them:
- github is using SASS for their stylesheets (github styleguide)
- Sass is part of Foundation 6 as well
- Twitter Bootstrap v3.x is built on LESS and has an official Sass port, too
- You can write and edit Sass and LESS with firefox directly (article)
- the same applies to chrome (chrome dev docs)
- ...
Am I not able to write CSS without preprocessors? NO
Does it make it easier to handle CSS? YES
The modularization and mixin features are really awesome and I don't want to miss it for my next project.
But don't forget the standards!
In the CSS3 spec there are already mathematical expressions and functions. Maybe someday CSS will support variables (css-variables WorkingDraft) natively and CSS-conditionals will contain more than @media and @supports.
Time will tell if native voodoo can replace preprocessing voodoo.