This post is a follow up on our tutorial guiding you through the setup on how to submit and run a Node.js app on a CoreOS cluster. Within the previous post, we only showed you how to submit and run a single app instance on a given machine within the cluster. This post will show you how to start multiple instances of our Node.js app on the cluster.
CoreOS Series Overview
- Platform Introduction and Components
- How to Set Up a Cluster
- Run Multiple Instances of Your Node.js App on Cluster
- How to Run a RethinkDB Cluster
Why Start Multiple Node.js App Instances?
Before we move on to the actual guide on how to run multiple instances of your Node.js app on a CoreOS cluste, we should clarify the why? first. In short: fault-tolerance and availability.
If you run your application on a single server, this server is the single point of failure. In case there is a disk or other hardware issue with the physical machine, your app won’t be available. Even if you load balance your traffic to multiple application instances on the same server, each instance isn’t available since the complete underlying machine died. With CoreOS, you run multiple machines as a cluster and you deploy applications to different servers. That means, if a single machine is down, this should affect only one server from your cluster. You still have other machines left. CoreOS, especially fleet, will automatically ensure that your defined number of application instances will run on the cluster (if that is possible with unavailable servers).
Preparation
To follow the upcoming steps, you’ll need a running CoreOS cluster. Additionally, we highly recommend to read the previous post on how to run a Node.js app inside a docker container on CoreOS. Within the previous post, we create the docker container hosting a Node.js application. Further, we committed our container changes and pushed the image to Docker's Hub which allows us to later pull the container when required.
Requirements:
- a running CoreOS cluster
- read previous post on how to run a single Node.js app instance on CoreOS
- docker image of your app (optional, you can use ours ;-))
If you’re just interested in the idea of running multiple app instances on CoreOS, please read on. This post will set you in the mindset of how to define the required unit files for your services.
Create the Unit Files
We’re kind of jumping right into the topic, because we assume that you’ve an exising docker container of your app, we can just go ahead and create the unit files for the service. We’ll run the app container service aside the app’s discovery service. The discovery service will spread the word about the container and announce each instance to etcd.
Unit File: node-etcd@.service
The following code block describes the unit file which will pull and start the actual application container. Within the [Unit] block, we set a description and the dependencies to etcd, docker and the service-related discovery service. This tells fleet to also kick off the discovery service aside this unit to announce the availability to etcd.
The [Service] block defines the app related pre-start, start and stop commands. First, we kill previous instances of this services inside the container if there is an existing one. Afterwards, we pull out latest application container image from Docker Hub. Within this example, we use the node-etcd application which runs a basic Node.js application and reads values from etcd.
[Unit]
Description=Node.js app inside a docker container reading a value from etcd
After=etcd2.service
After=docker.service
Requires=node-etcd-discovery@%i.service

[Service]
TimeoutStartSec=0
KillMode=none
EnvironmentFile=/etc/environment
ExecStartPre=-/usr/bin/docker kill node-etcd%1
ExecStartPre=-/usr/bin/docker rm node-etcd%1
ExecStartPre=/usr/bin/docker pull marcuspoehls/node-etcd
ExecStart=/usr/bin/docker run --name node-etcd%1 -p 3000:3000 \
    -P -e COREOS_PRIVATE_IPV4=${COREOS_PRIVATE_IPV4}          \
    marcuspoehls/node-etcd                                    \
    /bin/sh -c "cd /src && npm i && node server.js" -D FOREGROUND
ExecStop=/usr/bin/docker stop node-etcd%i

[X-Fleet]
Conflicts=node-etcd@*.service
Finally, the [X-Fleet] block defines the constrains for our unit. The only constraint we have for our application is that we don’t want multiple instances to be started on the same machine. Running multiple instances on the same machine would just result in local port collisions.
You probably noticed that we’re hard-coding the port forwarding from the docker container to host machine. We forward port 3000 to the host’s port 3000. If you want to access the application on another port, please forward to the desired one or use a reverse-proxy like nginx for internal routing.
Unit File: node-etcd-discovery@.service
As alread written, the discovery unit is a little helper to the app’s service which announces a new instance to etcd and with that makes information available to the cluster. You can define the information which should be stored to etcd once a new service instances starts on the cluster. We’re just saving the service name of each instance.
We bind this discovery service to the actual application unit. That means, the discovery service will be started automatically with the node-etcd application service.
[Unit]
Description=Announce node-etcd@%i service
BindsTo=node-etcd@%i.service

[Service]
EnvironmentFile=/etc/environment
ExecStart=/bin/sh -c "while true; do etcdctl set /announce/services/node-etcd%i ${COREOS_PUBLIC_IPV4}:3000 --ttl 60; sleep 45; done"
ExecStop=/usr/bin/etcdctl rm /announce/services/node-etcd%i

[X-Fleet]
MachineOf=node-etcd@%i.service
The [Unit] block defines the binding to the node-etcd service. Additionally, we set a constraint which tells fleet to run this discovery on the same machine as the appropriate node-etcd service. The wildcard %i will be replaced with the actual value while starting the unit using fleetctl and that helps fleet to find the correct service and discovery-service pairs.
Run Multiple Node.js App Instances on CoreOS Cluster
The unit files are created and we can move on to the next step: submit units to the cluster and start application instances on multiple machines.
The first step in more detail: submit the unit files to the cluster using fleetctl.
$ fleetctl submit node-etcd@.service node-etcd-discovery@.service
Unit node-etcd@.service inactive
Unit node-etcd-discovery@.service inactive

$ fleetctl list-unit-files
UNIT                           HASH      DSTATE     STATE      TARGET
hello.service                  e55c0ae   loaded     loaded     3781dfef.../172.17.8.101
node-etcd-discovery@.service   c8c5ae5   inactive   inactive   -
node-etcd@.service             e48e872   inactive   inactive   -
Alright, unit files are available to to fleet and we can directly start the application instances using fleetctl. Actually, the process to start units on machines is to load them first and afterwards initiate the start. Fleet has a shortcut for us and we can directly use the fleetctl start … command to load and start services on multiple machines.
We’re getting to the key question of this post: How to start multiple services at the same time?
Use fleetctl and add the desired range of how many services you want to start after the @ within the unit file name. The following example illustrates the syntax in more detail.
$ fleetctl start node-etcd\@{1..3}.service
Unit node-etcd@1.service inactive
Unit node-etcd@2.service inactive
Unit node-etcd@3.service inactive
Unit node-etcd@3.service launched on 767d4316.../172.17.8.103
Unit node-etcd@1.service launched on 9c1eed63.../172.17.8.104
Unit node-etcd@2.service launched on 3781dfef.../172.17.8.101
We tell fleet to start a total number of three application instances on the cluster. In the first step, fleet loads the units to the selected machines and afterwards initiates the container starts.
The range shortcut {1..3} enables us to directly start the desired number of services based on the same unit files.
Result
To actually verify that all units started correctly, check the current status with fleetctl list-units. If everything went smooth, the services are now in active/running state.
$ fleetctl list-units
UNIT                            MACHINE                    ACTIVE   SUB
node-etcd-discovery@1.service   9c1eed63.../172.17.8.104   active   running
node-etcd-discovery@2.service   3781dfef.../172.17.8.101   active   running
node-etcd-discovery@3.service   767d4316.../172.17.8.103   active   running
node-etcd@1.service             9c1eed63.../172.17.8.104   active   running
node-etcd@2.service             3781dfef.../172.17.8.101   active   running
node-etcd@3.service             767d4316.../172.17.8.103   active   running
The defined binding and constrains have been handled properly and fleet submitted the discovery services aside the corresponding application services.
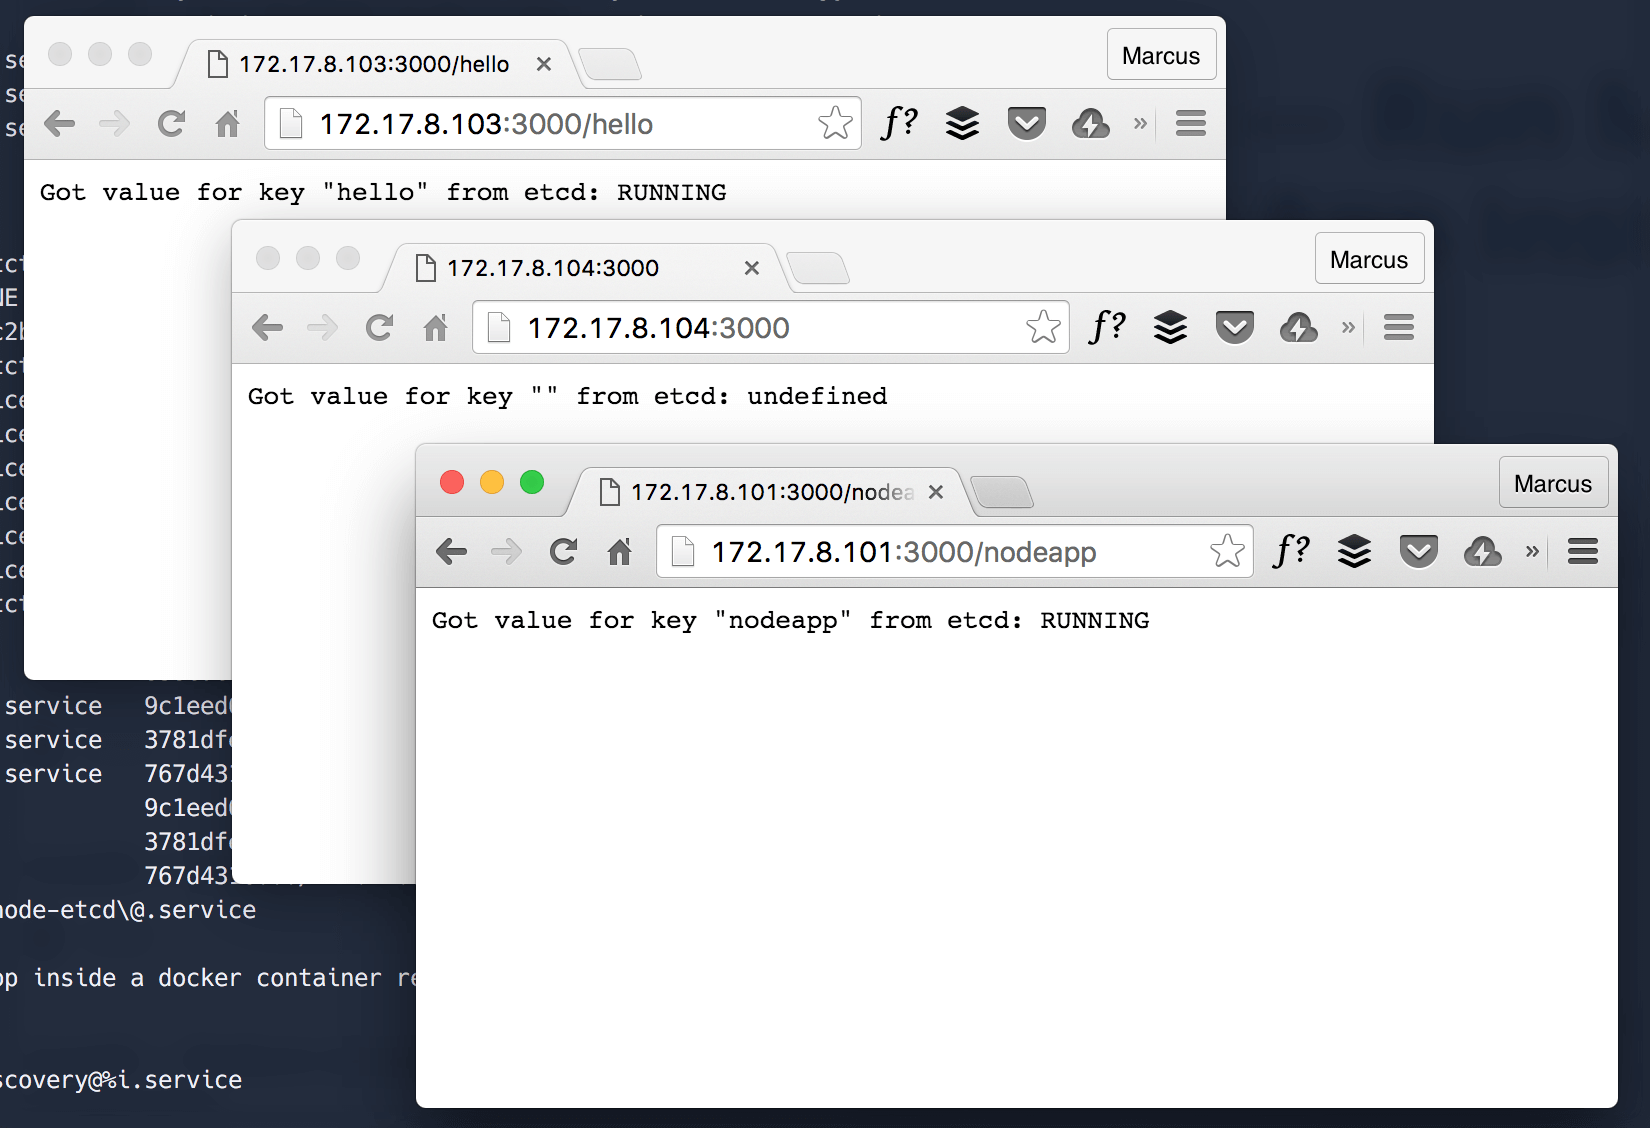
Of course you can perform another verification using the browser. Visit the IP addresses of the machines where the service was started and add your port if you didn’t run the app on port 80.
The units were started on the machines with trailing IP addresses .101, .103 and .104. Let’s open the addresses within the browser and check whether the apps are accessible.
What Comes Next
This post shows you the necessary steps to run multiple Node.js application instances on different machines within a CoreOS cluster. We walk you through the process of creating a unit file which makes the app generally accessible using the same port on each host. Additionally, you’ve learned how to apply the knowlegde on submitting a service to the cluster level and start multiple app instances at the same time.
Next week, we stay in the topic of submitting multiple application instances to the cluster. We’ll bootstrap a RethinkDB cluster on CoreOS!