During the last weeks, we’ve learned the fundamentals of three important components of the CoreOS ecosystem. Additionally, you’re able to manage key-value-pairs within etcd and services within our cluster using fleet featuring systemd.
This gives us all the required knowledge to finally make the step from just running hello-world units on the cluster. This post will show you how to create Node.js application inside a docker container and run it on your CoreOS cluster. Ready? Yes!
CoreOS Series Overview
- Fleet & How to Manage Services Within Your Cluster
- Run Your Node.js App on Cluster
Create the Docker App Container
There are multiple ways to create a Docker container. You’ve probably heard of DOCKERFILE’s and creating a container from the command line. This guide will follow along the command line to make the container creation more accessible. Of course, you can create your container by using a DOCKERFILE.
As the base image, we use Ubuntu 14.04. That’s an LTS release and will definitely be supported for quite some time. We’re going to create the initial docker container with the following command:
docker run -i -t ubuntu:14.04 /bin/bash
Let’s get things straight and explain the command with parameters from above:
run: tells docker to start a container with the following parameter (if existing) based on the given base image-i: tells docker to start the container in interactive mode and makes STDIN of the container available-t: tells docker to create a pseudo-TTY session. This gives us access to the terminal of the docker container running Ubuntuubuntu:14.04: this is actually a combination ofrepository:image. We’re using theubunturepository with base image14.04. Have a look at the Ubuntu Docker Hub repository for other images./bin/bash:: the command we want to execute inside the container. Since we’re going to install tools, we want access to the command line and spawn a shell session
Where to run the command?
That’s a good question! You can run this command from within one of your CoreOS machines. Since CoreOS heavily relies on docker, it comes directly with the operation system. Of course, you can run the command on your local machine. If you create the docker container locally, make sure you’ve docker installed.
Alright, let’s jump right into the output happening once you submit the command to either a CoreOS or your local machine.
$ docker run -i -t ubuntu:14.04 /bin/bash
Unable to find image 'ubuntu:14.04' locally
14.04: Pulling from library/ubuntu
0bf056161913: Downloading [>                                                  ] 539.8 kB/65.67 MB
1796d1c62d0c: Download complete
e24428725dd6: Download complete
89d5d8e8bafb: Download complete
The defined docker base image gets pulled from the Docker Hub if it isn’t already available locally. The download may take some time, be patient while waiting for the base image download to finish.
Once the download finished, you’ll be directly within the terminal session of the docker container.
$ docker run -i -t ubuntu:14.04 /bin/bash
Unable to find image 'ubuntu:14.04' locally
14.04: Pulling from library/ubuntu
0bf056161913: Pull complete
1796d1c62d0c: Pull complete
e24428725dd6: Pull complete
89d5d8e8bafb: Pull complete
Digest: sha256:d3b59c1d15c3cfb58d9f2eaab8a232f21fc670c67c11f582bc48fb32df17f3b3
Status: Downloaded newer image for ubuntu:14.04
root@999e20f43569:/#
Now that we have access to the Ubuntu shell, we can use the default package manager apt to update the repositories and install curl and Node.js. We use the Nodesource packages which need to be fetched with curl before we’re able to install Node.js. We use the current LTS release 4.x of Node.js. Fire the following commands within your docker container to get Node.js installed.
apt-get update
apt-get install -y curl
curl -sL https://deb.nodesource.com/setup_4.x | sudo -E bash -
apt-get install -y nodejs
Verify if everything is alright by checking the versions of Node.js and NPM.
$ node -v
v4.2.3
$ npm -v
2.14.7
Alright, we’re good to go and create the actual app.
Create Node.js App in Docker Container
The goal of this tutorial is to create and run a Node.js application within our CoreOS cluster. That requires us to create a basic Node.js server which at least responds to every request with a message. Let’s get a step ahead and read a value from etcd and reply to requests with a view showing the value (if existing) or a default message (if not set yet). Agreed? Agreed! :)
The following code snippet is the content of our server.js file which represents our Node.js app. Of course you can run more complex apps this way. This example is just for illustration purposes and shows the fundamentals to get a Node.js submitted and running on a CoreOS cluster.
We put the package.json and server.js files into the /src folder. This way, we have a specified folder to install for the dependencies and know from where to start the server when submitting and starting it on the cluster.
server.js
const http = require('http')
const Etcd = require('node-etcd')
const etcd = new Etcd('172.17.8.103', '4001')

const hostname = '0.0.0.0' // this will expose the Node.js server beyond localhost … avoid that in production!
const port = 3000

http.createServer((req, res) => {
  etcd.get(req.url.slice(1), function (err, result) {
    res.writeHead(200, { 'Content-Type': 'text/plain' })
    if (err) {
        console.log(err)
        res.end('No value for key "' + req.url.slice(1) + '" available in etcd')
    } else {
        res.end('Got value for key "' + req.url.slice(1) + '" from etcd: ' + result.node.value)
    }
  })
}).listen(port, hostname, () => {
  console.log('Server running at http://${hostname}:${port}/')
})
Initialize a Node.js with NPM inside your docker container using npm init. Tell NPM to use the created server.js file as the entry point for your app. Then install the node-etcd dependency via npm i -S node-etcd. Afterward, try to run the app and if everything went well, you should see the log that your server started at 127.0.0.1 using port 3000.
$ node server.js
Server running at http://127.0.0.1:3000/
Commit & Push the Container Image
Our docker container is prepared and the basic Node.js application is running like a charm. The next thing on the list is the to commit and push the container image to your Docker Hub repositories. To commit our container, we need the container ID. Use docker ps -l to show the container on your machine.
$ docker ps -l
CONTAINER ID        IMAGE               COMMAND             CREATED             STATUS                       PORTS               NAMES
999e20f43569        ubuntu:14.04        "/bin/bash"         31 minutes ago      Exited (130) 7 seconds ago                       cranky_bhabha
The important information is in the column of CONTAINER ID. In the example above it’s 999e20f43569. To create the same container again on another machine, we commit and push this container to the Docker Hub. Docker’s commit command uses the following structure:
docker commit <container id> <your-docker-hub-username>/<image-name>
Putting our actual values in place results in the following command and console output.
$ docker commit 999e20f43569 marcuspoehls/node-etcd
ad33048afe08911238d082bf68727fdb5465298910d0650eb151bba1d7c68c26
Changes are committed, we can finally push the container image. The upload and distribution process may take a while. Don’t get nervous if new machines occur while pushing the image, it’s the usual procedure :)
$ docker push marcuspoehls/node-etcd
The push refers to a repository [docker.io/marcuspoehls/node-etcd] (len: 1)
ad33048afe08: Pushed
89d5d8e8bafb: Pushed
e24428725dd6: Pushed
1796d1c62d0c: Pushed
0bf056161913: Pushing [=========>                                         ] 37.04 MB/187.7 MB
That’s it, our Node.js container is available via Docker Hub and we can move on to create the unit file which pulls the docker container onto the machine which will host our app.
Create Unit Files
The docker container is ready for deployment and pushed to Docker Hub. That means, we can create our unit files for deployment. We create two unit files: first, the one called node-etcd which boots the docker container and finally starts the Node.js server inside the container. Second, we create a little helper unit file that announces our app service to etcd.
Unit File: node-etcd Docker Container
The unit file describes itself. Just let me pick some important parts and explain them in more detail so everyone is on the same page and knows what’s going on here.
The [Unit] block just defines that we want this unit requires etcd and docker to run and also the dependency on our discovery service. Within the [Service] block, we tell fleet to remove all previously created containers with the name node-etcd%i where %i is the placeholder for the port number which we’ll pass during service start. Also, we execute docker run … including the commands to start our Node.js server inside the docker container. If the dependencies are not installed already, we’re going to install them and afterward kick off the server.
[Unit]
Description=Node.js app inside a docker container reading a value from etcd
After=etcd2.service
After=docker.service
Requires=node-etcd-discovery@%i.service

[Service]
TimeoutStartSec=0
KillMode=none
EnvironmentFile=/etc/environment
ExecStartPre=-/usr/bin/docker kill node-etcd%i
ExecStartPre=-/usr/bin/docker rm node-etcd%i
ExecStartPre=/usr/bin/docker pull marcuspoehls/node-etcd
ExecStart=/usr/bin/docker run --name node-etcd%i -p %i:3000 \
    -P -e COREOS_PRIVATE_IPV4=${COREOS_PRIVATE_IPV4}        \
    marcuspoehls/node-etcd                                  \
    /bin/sh -c "cd /src && npm i && node server.js" -D FOREGROUND
ExecStop=/usr/bin/docker stop node-etcd%i

[X-Fleet]
Conflicts=node-etcd@*.service
Stopping the service will tell Docker to stop the container. Additionally, we have an [X-Fleet] constraint that tells fleet to put this unit only once on a machine.
Unit File: node-etcd-discovery for Service Discovery
This little helper just announces our Node.js app to the rest of the cluster members and spreads the word once we launch the node-etcd service. Since it’s a requirement for node-etcd, it will be launched simultaneously. We don’t need to worry about starting the node-etcd-discovery service, because fleet does the work for us and starts it aside node-etcd.
[Unit]
Description=Announce node-etcd@%i service
BindsTo=node-etcd@%i.service

[Service]
EnvironmentFile=/etc/environment
ExecStart=/bin/sh -c "while true; do etcdctl set /announce/services/node-etcd%i ${COREOS_PUBLIC_IPV4}:%i --ttl 60; sleep 45; done"
ExecStop=/usr/bin/etcdctl rm /announce/services/node-etcd%i

[X-Fleet]
MachineOf=node-etcd@%i.service
Once the node-etcd service stops, fleet will remove the announcement from etcd. There is also a [X-Fleet] condition which binds the node-etcd-discovery unit to node-etcd and starts this service on the same machine as node-etcd launches.
Run Node.js App on CoreOS Cluster
This is our final step and we finally see our app going live on the CoreOS cluster. All the preparations distill down to start and run the app inside the docker container which will be pulled once we kick off the unit on our cluster. Let’s do this!
First, we need to submit the node-etcd and node-etcd-discovery services to our cluster using fleetctl.
$ fleetctl submit node-etcd@.service node-etcd-discovery@.service
Unit node-etcd@.service inactive
Unit node-etcd-discovery@.service inactive

$ fleetctl list-unit-files
UNIT                           HASH      DSTATE     STATE      TARGET
hello.service                  e55c0ae   loaded     loaded     3781dfef.../172.17.8.101
node-etcd-discovery@.service   c8c5ae5   inactive   inactive   -
node-etcd@.service             e48e872   inactive   inactive   -
Things went smoothly, the services are available to the cluster’s init system and are in inactive state. That’s what we expected because we just submitted them which doesn’t follow any service start.
Let’s get the unit loaded on a server. fleetctl will respect and follow our constraints defined within the [X-Fleet] block in the unit files. Since we defined the node-etcd-discovery service should run aside from the node-etcd service, we expect both services to be loaded on the same machine. If you want to shortcut this procedure, you can just start the node-etcd service and fleet will handle the service loading.
$ fleetctl load node-etcd@3000.service
Unit node-etcd@3000.service inactive
Unit node-etcd@3000.service loaded on 767d4316.../172.17.8.103

$ fleetctl load node-etcd-discovery@3000.service
Unit node-etcd-discovery@3000.service inactive
Unit node-etcd-discovery@3000.service loaded on 767d4316.../172.17.8.103
Yeah, both services got submitted to our machine with trailing IP .103. That’s the intended behavior!
We’re very close to run the Node.js server. Our unit files specify, that the node-etcd-discovery service is bind to the actual node-etcd service. That means, we can just start the node-etcd service and fleet will automatically boot both! Great work fleet developers :)
$ fleetctl start node-etcd@3000.service
Unit node-etcd@3000.service launched on 767d4316.../172.17.8.103

fleetctl list-units
UNIT                               MACHINE                       ACTIVE        SUB
hello.service                      3781dfef.../172.17.8.101      inactive      dead
node-etcd-discovery@3000.service   767d4316.../172.17.8.103      active        running
node-etcd@3000.service             767d4316.../172.17.8.103      active        running
That looks great, bot node-etcd* services are in active and running state. Let’s check if we can access the server.
Result
Now that we’ve started our Node.js app on our CoreOS cluster, let’s check whether we can access the app via a browser. Just use the IP address of the server where the service was loaded and started on. In our example, it’s the server with IP address 172.17.8.103. Open the browser and access the Node.js server on port 3000 because we forwarded the port 3000 from the docker container to the host machine.
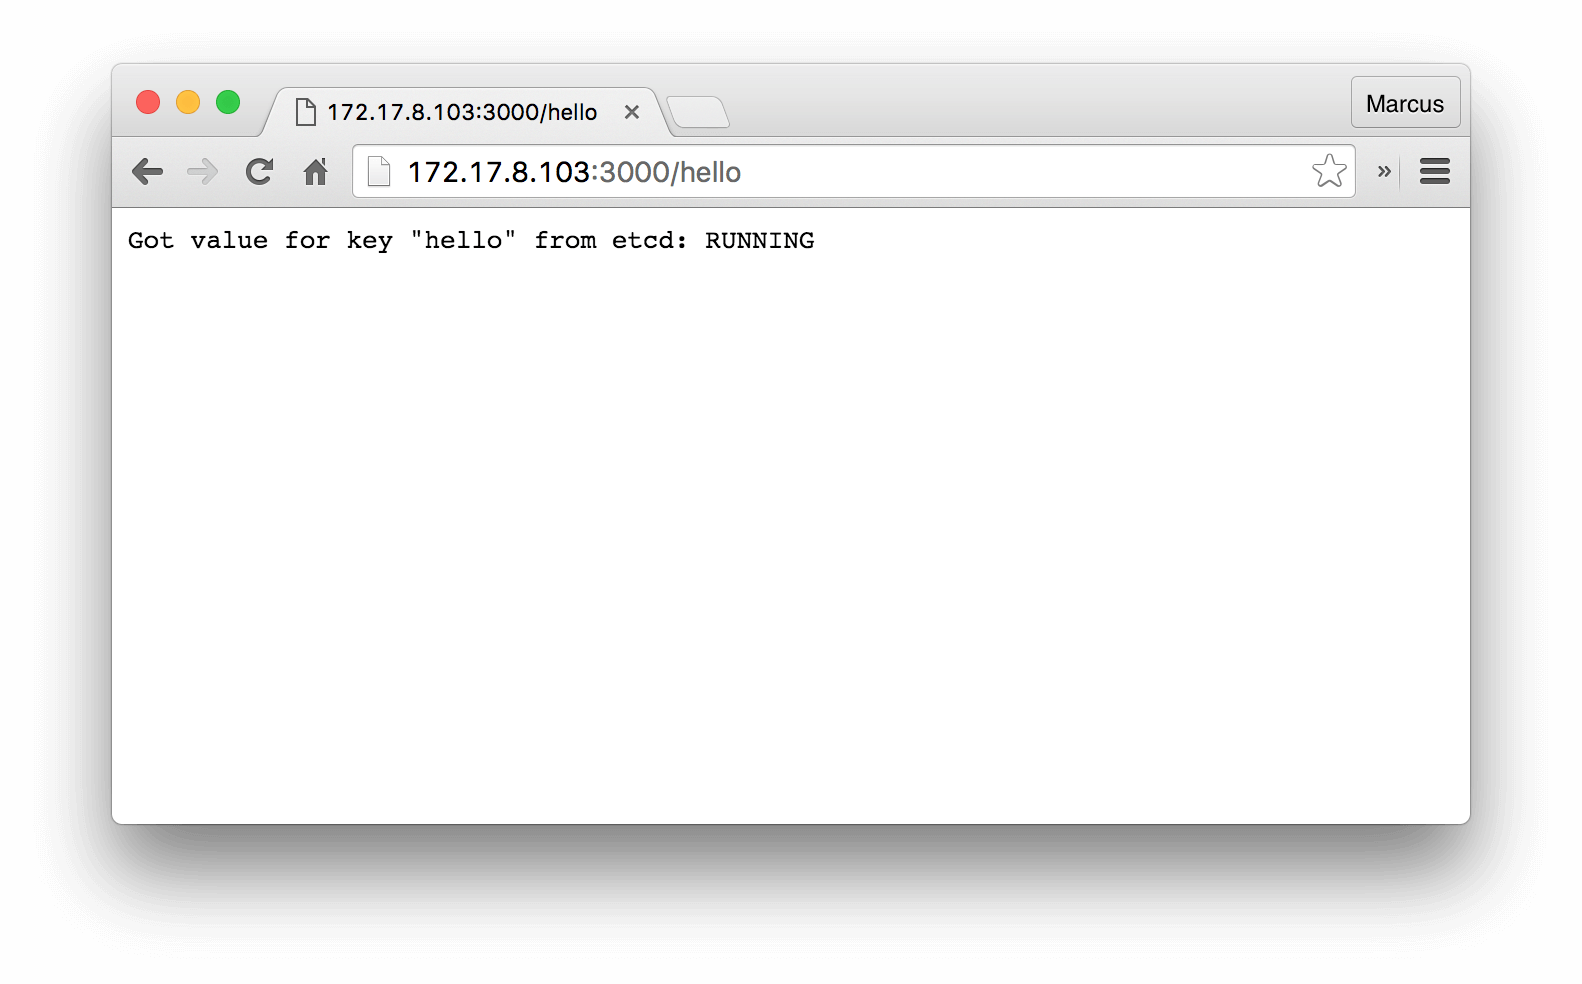
Booyah! Our app is running and if you set any key using etcdctl, you can read and display the value using our Node.js app. Set random values using etcdctl and check whether they’re accessible.
Problems
While preparing this guide, we ran into various docker issues and it took some time to figure out what caused the errors. We describe our solution strategies in the following sections.
Can’t Connect to the Docker Daemon
While preparing the docker container directly on our host machine (running OS X), we hat some issues to run docker commands. Every time we wanted to create a new docker container, we just got the following message:
Cannot connect to the Docker daemon. Is the docker daemon running on this host?
Fix:
We needed to run a boot2docker initialization process. Whatever caused these issues could be fixed by just running the following command:
$(boot2docker shellinit)
Docker Client and Server don’t have the same version
Once we got the problem above fixed, another error message occurred and we began to search for a solution having the version mismatch.
Error response from daemon: client and server don't have the same version (client: 1.21, server: 1.16)
Fix:
Just update boot2docker on your machine using the following command. It will download and install the images and there’s no need for additional configurations.
boot2docker upgrade
What Comes Next
Within this post, you’ve learned how to create a docker container including your Node.js app. Further, we’ve committed and pushed the docker container to your Docker Hub account and used it later for deployment on your own CoreOS cluster. Once we had a prepared docker container, we created the unit files to start the app on one of our cluster members.
The next post will cover app scalability. We’re going to run multiple instances of an app on different hosts within the cluster.