You've already learned a lot about Picasso. Nevertheless, until now we've always assumed you're just loading the images into an ImageView. However, this is rarely the exclusive use in an Android app. You might need to load an image without displaying it in an ImageView, or you want to learn how to warm up the cache.
If you're interested in these topics, keep reading! If you need a refresh of the topics covered in this series, take a look at the post outline:
Picasso Series Overview
- Placeholders, Errors, and Fading
- Image Resizing, Scaling and fit()
- Callbacks, RemoteViews and Notifications
- Advanced ListViews With Images
- Image Loading for RecyclerView and CardView
Callbacks and Targets
Before we jump into callbacks, it might be worth to point out the various ways to load an image. Picasso generally offers synchronous and asynchronous loading.
Difference between fetch(), get() and Target
.fetch() will asynchronously load the image in a background thread, but will neither display it in an ImageView, nor return the bitmap. This method only saves the image to the disk and memory caches. It could be used to fill up the image cache in the background, if you know you'll need the image shortly after and want to reduce the loading times.
.get() synchronously loads the image and returns a Bitmap object. Be sure you're not calling .get() from a UI thread. That would freeze the UI!
Besides using the .into() option, there is another method: callbacks. In Picasso's language these are named Targets.
Use Target as Callback Mechanism
So far, we've always used an ImageView as parameter for .into(). That is not the complete functionality of .into(). It is also possible to use an implementation of the Target interface.
Picasso will load the image just like before, but instead of displaying it in an ImageView, it'll return the Bitmap (or the error!) the Target callback.
Let's look at an example. The Picasso creation would be basically the same to our previous examples:
Picasso
    .with(context)
    .load(UsageExampleListViewAdapter.eatFoodyImages[0])
    .into(target);
The interesting part would be an implementation of Target:
private Target target = new Target() {
    @Override
    public void onBitmapLoaded(Bitmap bitmap, Picasso.LoadedFrom from) {
        // loading of the bitmap was a success
        // TODO do some action with the bitmap
    }

    @Override
    public void onBitmapFailed(Drawable errorDrawable) {
        // loading of the bitmap failed
        // TODO do some action/warning/error message
    }

    @Override
    public void onPrepareLoad(Drawable placeHolderDrawable) {

    }
};
If the action succeeded, the callback will receive the bitmap object and a Picasso.LoadedFrom object. Latter will specify if the image comes from a cache or the network. At this point, you could do anything you need to do with the bitmap. In a previous blog post, we showed how to blur an image efficiently with RenderScript, if you don't want to use Picasso transformations.
In conclusion, whenever you need the raw bitmap use either .get() or an implementation of Target to receive the image.
Important: always declare the target implementation as a field, not anonymously! The garbage collector could otherwise destroy your target object and you'll never get the bitmap.
Load Images to Custom Notifications with RemoteViews
A rather new feature is to load images into RemoteViews. RemoteViews are used for Widgets and custom notification layouts.
Let's look at an example for a custom notification with RemoteViews. If you're interested in custom notification layouts, you probably know how to build notifications. Hopefully, the following code will not look to foreign to you:
// create RemoteViews
final RemoteViews remoteViews = new RemoteViews(getPackageName(), R.layout.remoteview_notification);

remoteViews.setImageViewResource(R.id.remoteview_notification_icon, R.mipmap.future_studio_launcher);

remoteViews.setTextViewText(R.id.remoteview_notification_headline, "Headline");
remoteViews.setTextViewText(R.id.remoteview_notification_short_message, "Short Message");

remoteViews.setTextColor(R.id.remoteview_notification_headline, getResources().getColor(android.R.color.black));
remoteViews.setTextColor(R.id.remoteview_notification_short_message, getResources().getColor(android.R.color.black));

// build notification
NotificationCompat.Builder mBuilder = new NotificationCompat.Builder(UsageExampleTargetsAndRemoteViews.this)
    .setSmallIcon(R.mipmap.future_studio_launcher)
    .setContentTitle("Content Title")
    .setContentText("Content Text")
    .setContent(remoteViews)
    .setPriority(NotificationCompat.PRIORITY_MIN);

final Notification notification = mBuilder.build();

// set big content view for newer androids
if (android.os.Build.VERSION.SDK_INT >= 16) {
    notification.bigContentView = remoteViews;
}

NotificationManager mNotificationManager = (NotificationManager) this.getSystemService(Context.NOTIFICATION_SERVICE);
mNotificationManager.notify(NOTIFICATION_ID, notification);
All this does is create a notification with a custom layout. We won't go into the details since it's not part of this tutorial. What's interesting is the next step: loading the image into the ImageView.
Once again, the Picasso call is incredibly easy. Similar to the ImageViews, we use the .into() function for RemoteViews as well. However, the parameters are different: .into(android.widget.RemoteViews remoteViews, int viewId, int notificationId, android.app.Notification notification).
The code for our example app looks like this:
Picasso
    .with(UsageExampleTargetsAndRemoteViews.this)
    .load(UsageExampleListViewAdapter.eatFoodyImages[0])
    .into(remoteViews, R.id.remoteview_notification_icon, NOTIFICATION_ID, notification);
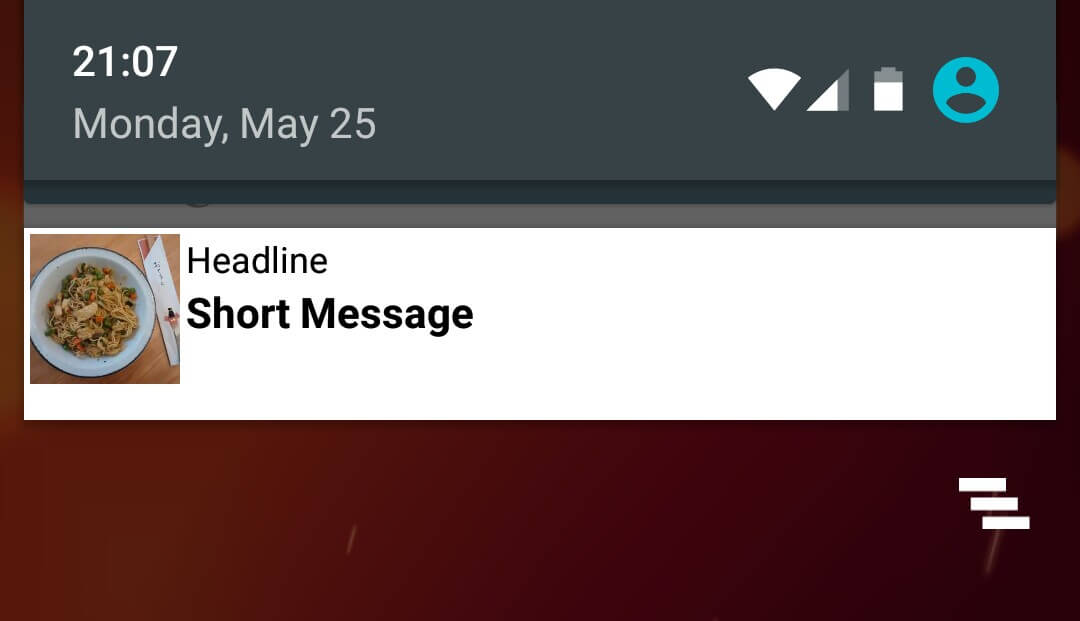
Perhaps you're not sure what each variable holds, please refer back to the long code block above to understand the parameters. Our example notification has the following look:

In case you're interested in loading images into Widgets, use another .into() call with the following parameters: into(android.widget.RemoteViews remoteViews, int viewId, int[] appWidgetIds).
Outlook
In this blog post, you've learned a few additional options for loading images. You can load them
- synchronously with
get() - asynchronously with
fetch() - into
ImageViews - into
Targets - into
RemoteViews.
If you're building a complex Android app, you might actually run into all of these use cases. If you've read all of previous posts in this series, you have an extensive knowledge of loading images. It's time to go beyond simple loading and displaying of images.
In our next post, we'll add two possibly important components: image rotation and transformations.
