This is the fourth post in our series of custom fonts on Android. In the last few weeks, we've seen how to use custom fonts and apply different styles to a TextView. This week, we'll show an advanced solution on adding a font parameter to the TextView XML in order to set the font dynamically — without any code!
If you haven't read the previous blog posts, you should do so. It might help your understanding since they're all based on each other.
Also, feel free to take a look at the entire example project on Github.
Custom Fonts on Android Series Overview
Different Fonts
Generally, we like using other beautiful fonts besides Roboto as a way to let the app stand out, be different and rememberable to the user. While we explain in this post an easy way to use multiple fonts, proceed with caution. Any UI with too many fonts just gets messy and distracting!
Of course, you might have your reason for adding more than one custom font. For example, we love using FontAwesome for well-designed icons, customizable in size and color. It's very convenient to set the font directly via XML without an additional line of Java code. Before we get to that, we'll need to do some small preparations.
Preparing a Custom XML Property
Since we want to set the font via XML and Android has no appropriate TextView property we can hijack (similar like we did in our previous blog post), we've to add a custom property we call font. The first step is to add a attrs.xml in your /values/ folder. The content should look like this:
<?xml version="1.0" encoding="utf-8"?>
<resources>
    <declare-styleable name="CustomFontTextView">
        <attr name="font" format="string"/>
    </declare-styleable>
</resources>
All this does is let the system know we've a custom property with the name font belonging to the class CustomFontTextView. From now on we can access that property in code and in XML.
Let's go one step further and add the name of the fonts we want to use as a String resource in /values/strings.xml:
<resources>
    <string name="font_name_fontawesome">fontawesome</string>
    <string name="font_name_source_sans_pro">SourceSansPro</string>
</resources>
This will make some things easier for us down the road. Our preparations are done, onto the important parts ...
Using the font-Property
Let's look at the XML to learn how to use the newly added property font. First thing you've to do is add this line
xmlns:app="http://schemas.android.com/apk/res-auto"
to your highest view hierarchy element. For example, if your view is nested in a LinearLayout, it'd look like this:
<LinearLayout
    xmlns:android="http://schemas.android.com/apk/res/android"
        xmlns:app="http://schemas.android.com/apk/res-auto"
...>
xml
That one line allows you to access the font parameter by prefacing it with app:. Of couse, you can freely change the app: to anything you like.
As already mentioned, you now can set your custom XML property via app:font, for example:
        android:layout_width="wrap_content"
        android:layout_height="wrap_content"
        android:layout_margin="12dp"
        android:text="http://futurestud.io/blog/"
        android:textSize="18sp"
        android:textStyle="italic"
        app:font="@string/font_name_source_sans_pro"/>
xml
The code above would display the link to our blog in Source Sans Pro. Our other font, FontAwesome, is rather for single character use. We looked at the FontAwesome CheatSheet and used the code for the rocket icon () five times:
        android:layout_width="wrap_content"
        android:layout_height="wrap_content"
        android:layout_margin="12dp"
        android:text="    "
        android:textSize="18sp"
        app:font="@string/font_name_fontawesome"/>
This should display the rocket item fives times, since the FontAwesome font will be applied. However, before that works, we've to go one last step.
Implementation of CustomFontTextView
We've seen in the previous blog post how to obtain the value of an XML property. However, since we use a custom property this time, the code is a little more complex. First, we've to get an array with all properties with calling obtainStyledAttributes():
TypedArray attributeArray = context.obtainStyledAttributes(
    attrs,
    R.styleable.CustomFontTextView
);
The last parameter is a reference to the attrs.xml file we created as the first step! Now we just need to use the getString() function on the attributeArray to get the specified font name:
String fontName = attributeArray.getString(R.styleable.CustomFontTextView_font);
Lastly, we've to extend our logic in our CustomFontTextView to set the font correctly. The important changes happened in applyCustomFont() and selectTypeface(). The entire class now looks like this:
public class CustomFontTextView extends TextView {

    public static final String ANDROID_SCHEMA = "http://schemas.android.com/apk/res/android";

    public CustomFontTextView(Context context, AttributeSet attrs) {
        super(context, attrs);

        applyCustomFont(context, attrs);
    }

    public CustomFontTextView(Context context, AttributeSet attrs, int defStyle) {
        super(context, attrs, defStyle);

        applyCustomFont(context, attrs);
    }

    private void applyCustomFont(Context context, AttributeSet attrs) {
        TypedArray attributeArray = context.obtainStyledAttributes(
                  attrs,
                  R.styleable.CustomFontTextView);

        String fontName = attributeArray.getString(R.styleable.CustomFontTextView_font);
        int textStyle = attrs.getAttributeIntValue(ANDROID_SCHEMA, "textStyle", Typeface.NORMAL);

        Typeface customFont = selectTypeface(context, fontName, textStyle);
        setTypeface(customFont);

        attributeArray.recycle();
    }

    private Typeface selectTypeface(Context context, String fontName, int textStyle) {
          if (fontName.contentEquals(context.getString(R.string.font_name_fontawesome))) {
              return FontCache.getTypeface("fontawesome.ttf", context);
          }
          else if (fontName.contentEquals(context.getString(R.string.font_name_source_sans_pro))) {
              /*
              information about the TextView textStyle:
              http://developer.android.com/reference/android/R.styleable.html#TextView_textStyle
              */
              switch (textStyle) {
                  case Typeface.BOLD: // bold
                      return FontCache.getTypeface("SourceSansPro-Bold.ttf", context);

                  case Typeface.ITALIC: // italic
                      return FontCache.getTypeface("SourceSansPro-Italic.ttf", context);

                case Typeface.BOLD_ITALIC: // bold italic
                    return FontCache.getTypeface("SourceSansPro-BoldItalic.ttf", context);

                  case Typeface.NORMAL: // regular
                  default:
                      return FontCache.getTypeface("SourceSansPro-Regular.ttf", context);
              }
          }
          else {
              // no matching font found
              // return null so Android just uses the standard font (Roboto)
              return null;
          }
      }
If the function cannot find an appropriate font, we'll return null so Android just uses Roboto as a default.
Reviewing the Results
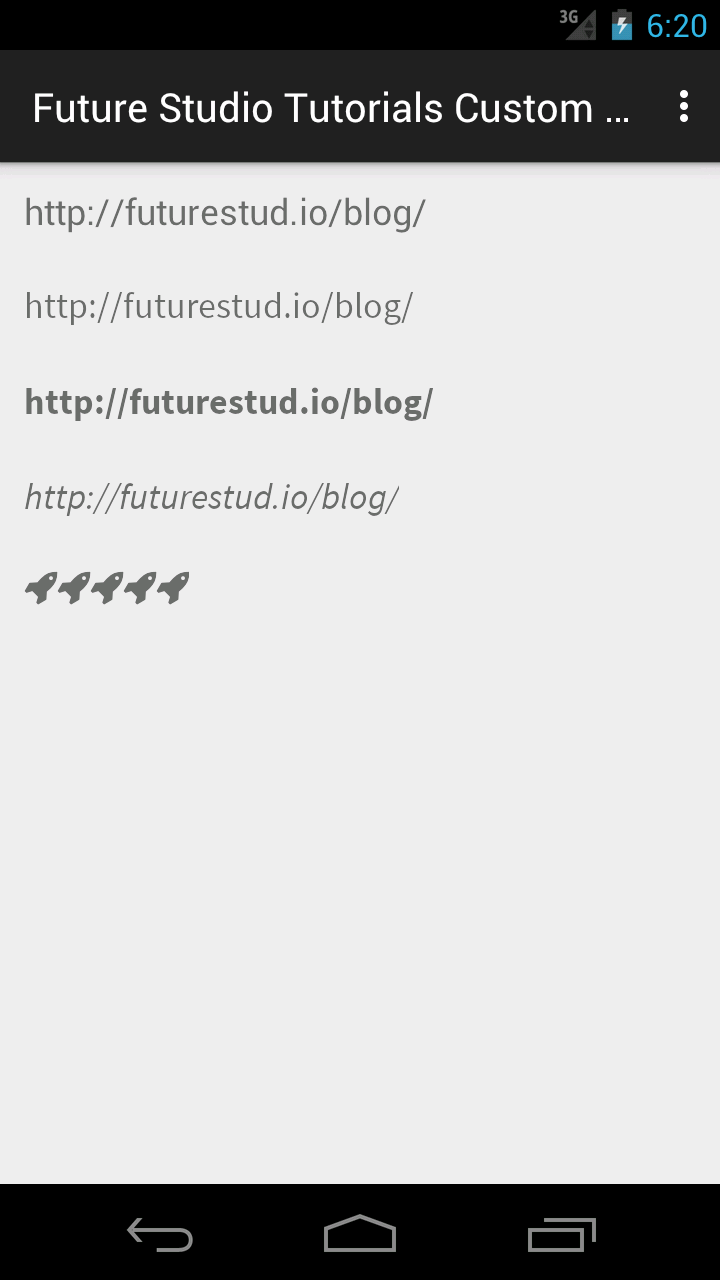
As always, we'll demonstrate the functionality in our example activity, now with another line for FontAwesome:
<LinearLayout xmlns:android="http://schemas.android.com/apk/res/android"
xmlns:app="http://schemas.android.com/apk/res-auto"
android:layout_width="match_parent"
android:layout_height="match_parent"
android:orientation="vertical">
<TextView
android:layout_width="wrap_content"
android:layout_height="wrap_content"
android:layout_margin="12dp"
android:text="http://futurestud.io/blog/"
android:textSize="18sp"/>
<io.futurestud.tutorials.customfont.CustomFontTextView
android:layout_width="wrap_content"
android:layout_height="wrap_content"
android:layout_margin="12dp"
android:text="http://futurestud.io/blog/"
android:textSize="18sp"
app:font="@string/font_name_source_sans_pro"/>
<io.futurestud.tutorials.customfont.CustomFontTextView
android:layout_width="wrap_content"
android:layout_height="wrap_content"
android:layout_margin="12dp"
android:text="http://futurestud.io/blog/"
android:textSize="18sp"
android:textStyle="bold"
app:font="@string/font_name_source_sans_pro"/>
<io.futurestud.tutorials.customfont.CustomFontTextView
android:layout_width="wrap_content"
android:layout_height="wrap_content"
android:layout_margin="12dp"
android:text="http://futurestud.io/blog/"
android:textSize="18sp"
android:textStyle="italic"
app:font="@string/font_name_source_sans_pro"/>
<io.futurestud.tutorials.customfont.CustomFontTextView
android:layout_width="wrap_content"
android:layout_height="wrap_content"
android:layout_margin="12dp"
android:text=""
android:textSize="18sp"
app:font="@string/font_name_fontawesome"/>
</LinearLayout>
The view of the activity would look like this:

Next Steps
This is everything you've to do to specify custom fonts via XML! Feel free to add or change fonts according to your needs. At this point, we're technically done with the series. However, we'll add two more blog posts on how to change the standard font for each build variant and how to apply the custom fonts to other standard views (for example Button).
Let us know if everything works well for you in the comments or on twitter @futurestud_io.