As with every web form where users need to provide their credentials, a login form can be complex. You know all the situations that can occur for invalid user inputs, like validation errors and the related handling, making sure the user understands what’s wrong, rendering the related input fields in erroneous colors, and so on.
Additionally to all possible errors, you want to provide comfort features like autofill the previously typed username or redirecting the user to the page that requires login.
This tutorial shows you how to implement the redirect to a previously visited page after a session based login with hapi-auth-cookie.
hapi Series Overview
- What You’ll Build
- Prepare Your Project: Stack & Structure
- Environment Variables and Storing Secrets
- Set Up MongoDB and Connect With Mongoose
- Sending Emails in Node.js
- Load the User’s Profile Picture From Gravatar Using Virtuals in Mongoose
- Implement a User Profile Editing Screen
- Generate a Username in Mongoose Middleware
- Displaying Seasons and Episodes for TV Shows with Mongoose Relationship Population
- Implementing Pagination for Movies
- Implement a Watchlist
- Create a Full Text Search with MongoDB
- Create a REST API with JSON Endpoints
- Update Mongoose Models for JSON Responses
- API Pagination for TV Shows
- Customize API Endpoints with Query Parameters
- Always Throw and Handle API Validation Errors
- Advanced API Validation With Custom Errors
- Create an API Documentation with Swagger
- Customize Your Swagger API Documentation URL
- Describe Endpoint Details in Your Swagger API Documentation
- 10 Tips on API Testing With Postman
- JWT Authentication in Swagger API Documentation
- API Versioning with Request Headers
- API Login With Username and Password to Generate a JWT
- JWT Authentication and Private API Endpoints
- Refresh Tokens With JWT Authentication
- Create a JWT Utility
- JWT Refresh Token for Multiple Devices
- Check Refresh Token in Authentication Strategy
- Rate Limit Your Refresh Token API Endpoint
- How to Revoke a JWT
- Invalidate JWTs With Blacklists
- JWT Logout (Part 1/2)
- JWT “Immediate” Logout (Part 2/2)
- A Better Place to Invalidate Tokens
- How to Switch the JWT Signing Algorithm
- Roll Your Own Refresh Token Authentication Scheme
- JWT Claims 101
- Use JWT With Asymmetric Signatures (RS256 & Co.)
- Encrypt the JWT Payload (The Simple Way)
- Increase JWT Security Beyond the Signature
- Unsigned JSON Web Tokens (Unsecured JWS)
- JWK and JWKS Overview
- Provide a JWKS API Endpoint
- Create a JWK from a Shared Secret
- JWT Verification via JWKS API Endpoint
- What is JOSE in JWT
- Encrypt a JWT (the JWE Way)
- Authenticate Encrypted JWTs (JWE)
- Encrypted and Signed JWT (Nested JWT)
- Bringing Back JWT Decoding and Authentication
- Bringing Back JWT Claims in the JWT Payload
- Basic Authentication With Username and Password
- Authentication and Remember Me Using Cookies
- How to Set a Default Authentication Strategy
- Define Multiple Authentication Strategies for a Route
- Restrict User Access With Scopes
- Show „Insufficient Scope“ View for Routes With Restricted Access
- Access Restriction With Dynamic and Advanced Scopes
- hapi - How to Fix „unknown authentication strategy“
- Authenticate with GitHub And Remember the Login
- Authenticate with GitLab And Remember the User
- How to Combine Bell With Another Authentication Strategy
- Custom OAuth Bell Strategy to Connect With any Server
- Redirect to Previous Page After Login
- How to Implement a Complete Sign Up Flow With Email and Password
- How to Implement a Complete Login Flow
- Implement a Password-Reset Flow
- Views in hapi 9 (and above)
- How to Render and Reply Views
- How to Reply and Render Pug Views (Using Pug 2.0)
- How to Create a Dynamic Handlebars Layout Template
- Create and Use Handlebars Partial Views
- Create and Use Custom Handlebars Helpers
- Specify a Different Handlebars Layout for a Specific View
- How to Create Jade-Like Layout Blocks in Handlebars
- Use Vue.js Mustache Tags in Handlebars Templates
- How to Use Multiple Handlebars Layouts
- How to Access and Handle Request Payload
- Access Request Headers
- How to Manage Cookies and HTTP States Across Requests
- Detect and Get the Client IP Address
- How to Upload Files
- Quick Access to Logged In User in Route Handlers
- How to Fix “handler method did not return a value, a promise, or throw an error”
- How to Fix “X must return an error, a takeover response, or a continue signal”
- Query Parameter Validation With Joi
- Path Parameter Validation With Joi
- Request Payload Validation With Joi
- Validate Query and Path Parameters, Payload and Headers All at Once on Your Routes
- Validate Request Headers With Joi
- Reply Custom View for Failed Validations
- Handle Failed Validations and Show Errors Details at Inputs
- How to Fix AssertionError, Cannot validate HEAD or GET requests
Preparation & Requirements
This tutorial assumes that you’re implementing a cookie-based authentication with hapi-auth-cookie. For other authentication strategies like JWT or OAuth, use this tutorial as an inspiration for your custom implementation :)
Starting Point
Imagine the following scenario: you’re browsing a website and at some point hitting a wall by seeing the login form. To view the visited page you need to authenticate. For a good user experience, developers should implement a redirect after the login that proceeds to the page that was selected by the user.
In that case, the user was interrupted due to the login form, but can move on browsing the private sections immediately and doesn’t need to find its way back to the originally requested site.
The following —simplified— screen illustrates two links for a user: a private page or the user’s profile. Both sites require authentication.
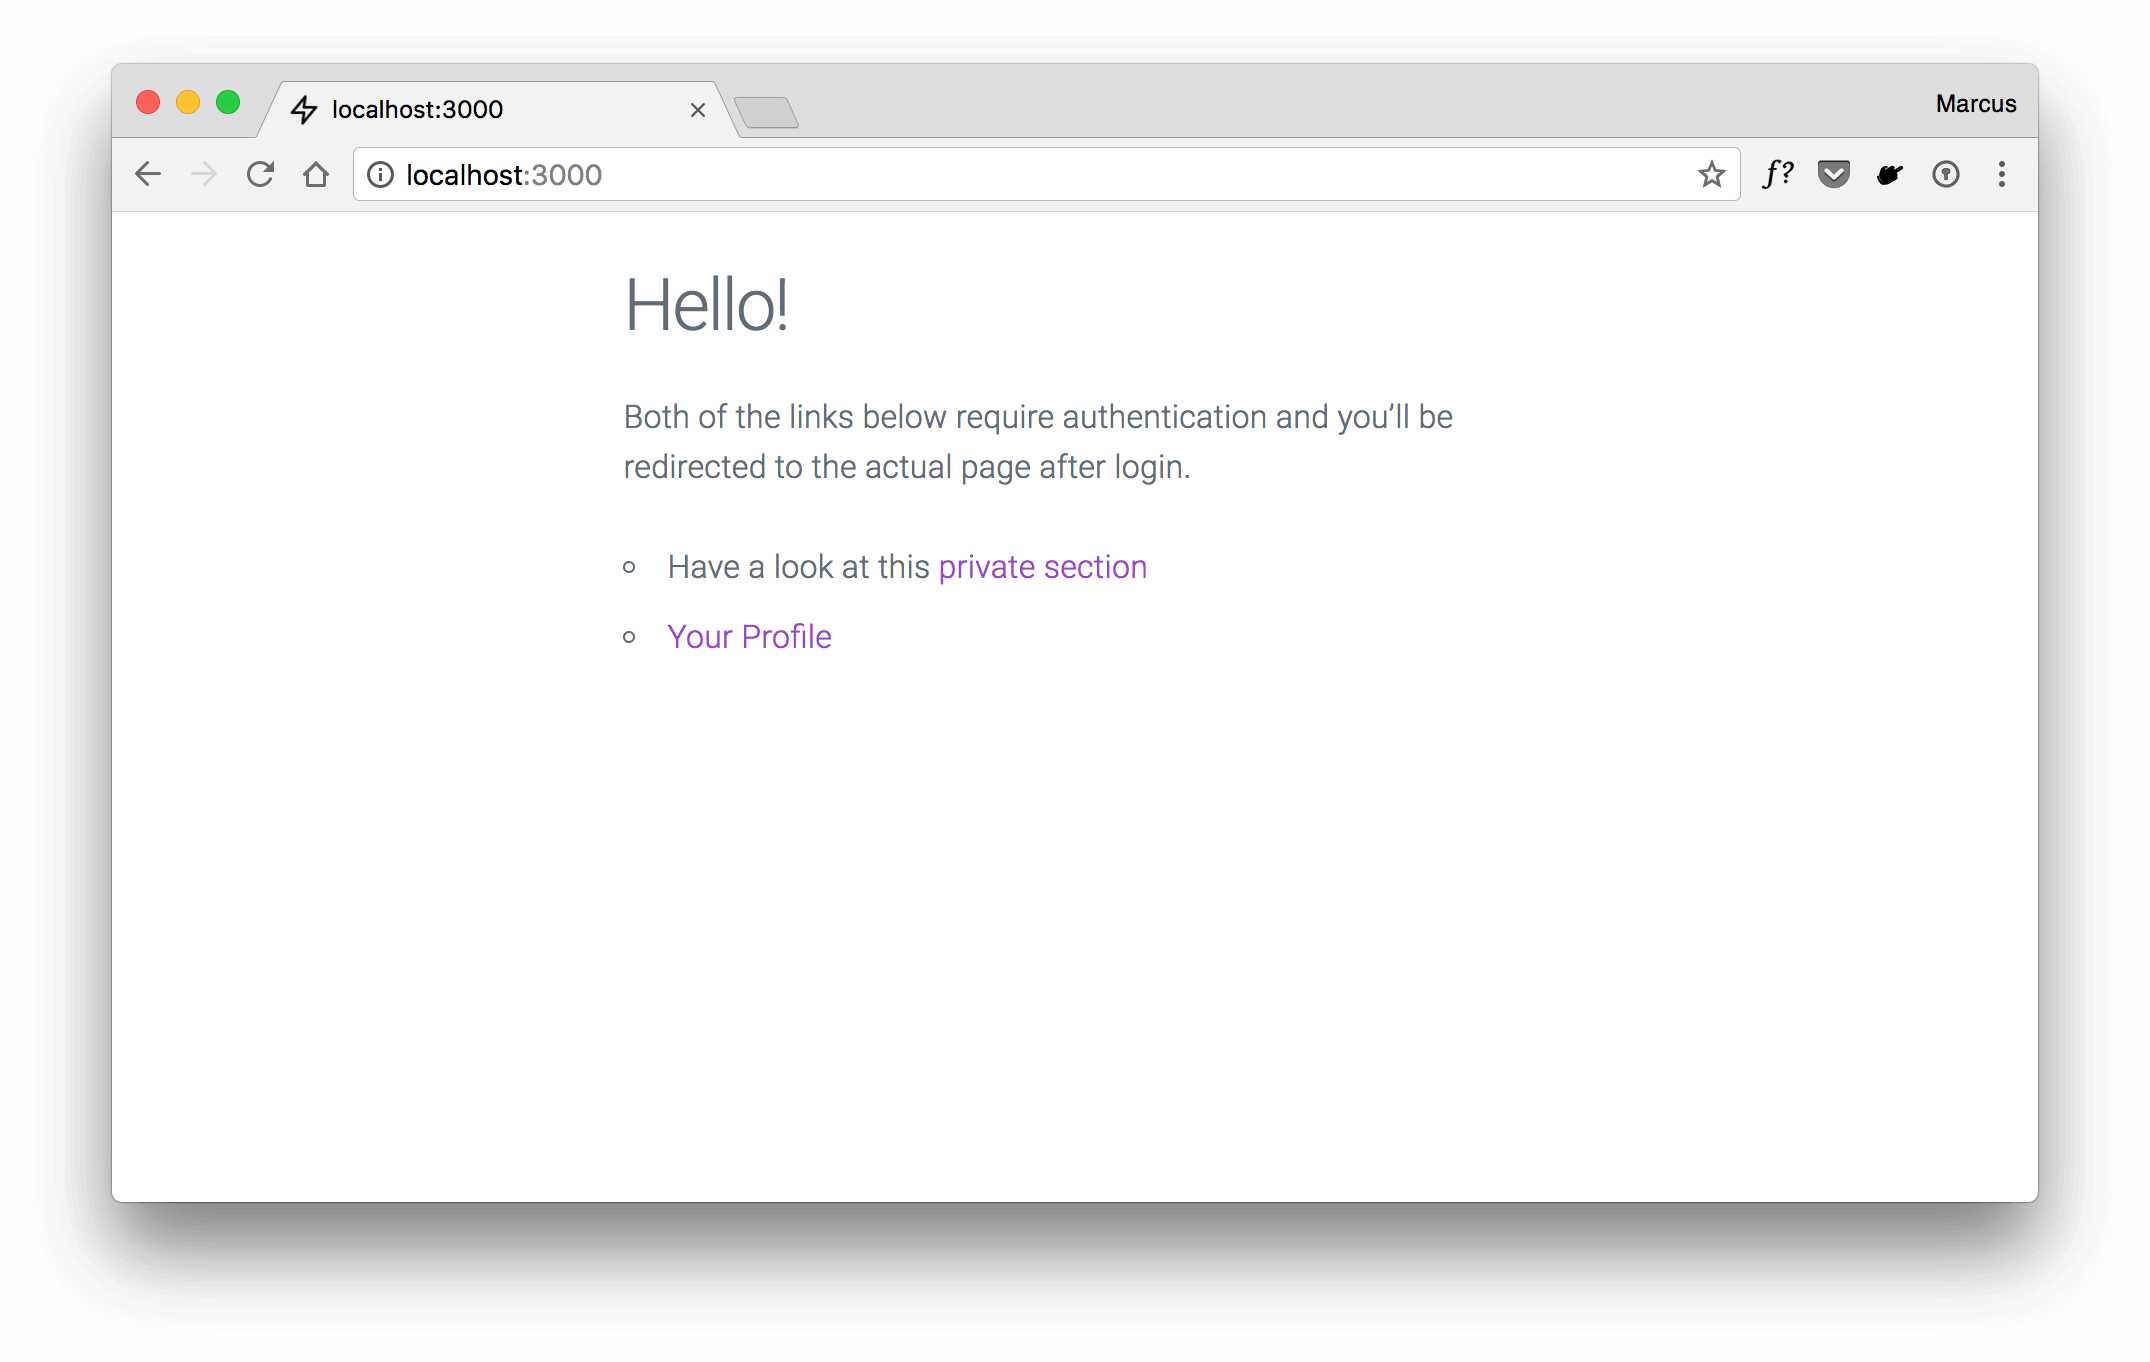
Let’s say you’ve clicked the private section and due to the authentication requirements you’re redirected to the login page.
As you can see within the url bar, there’s a query parameter called next that keeps the selected link’s relative URL path:
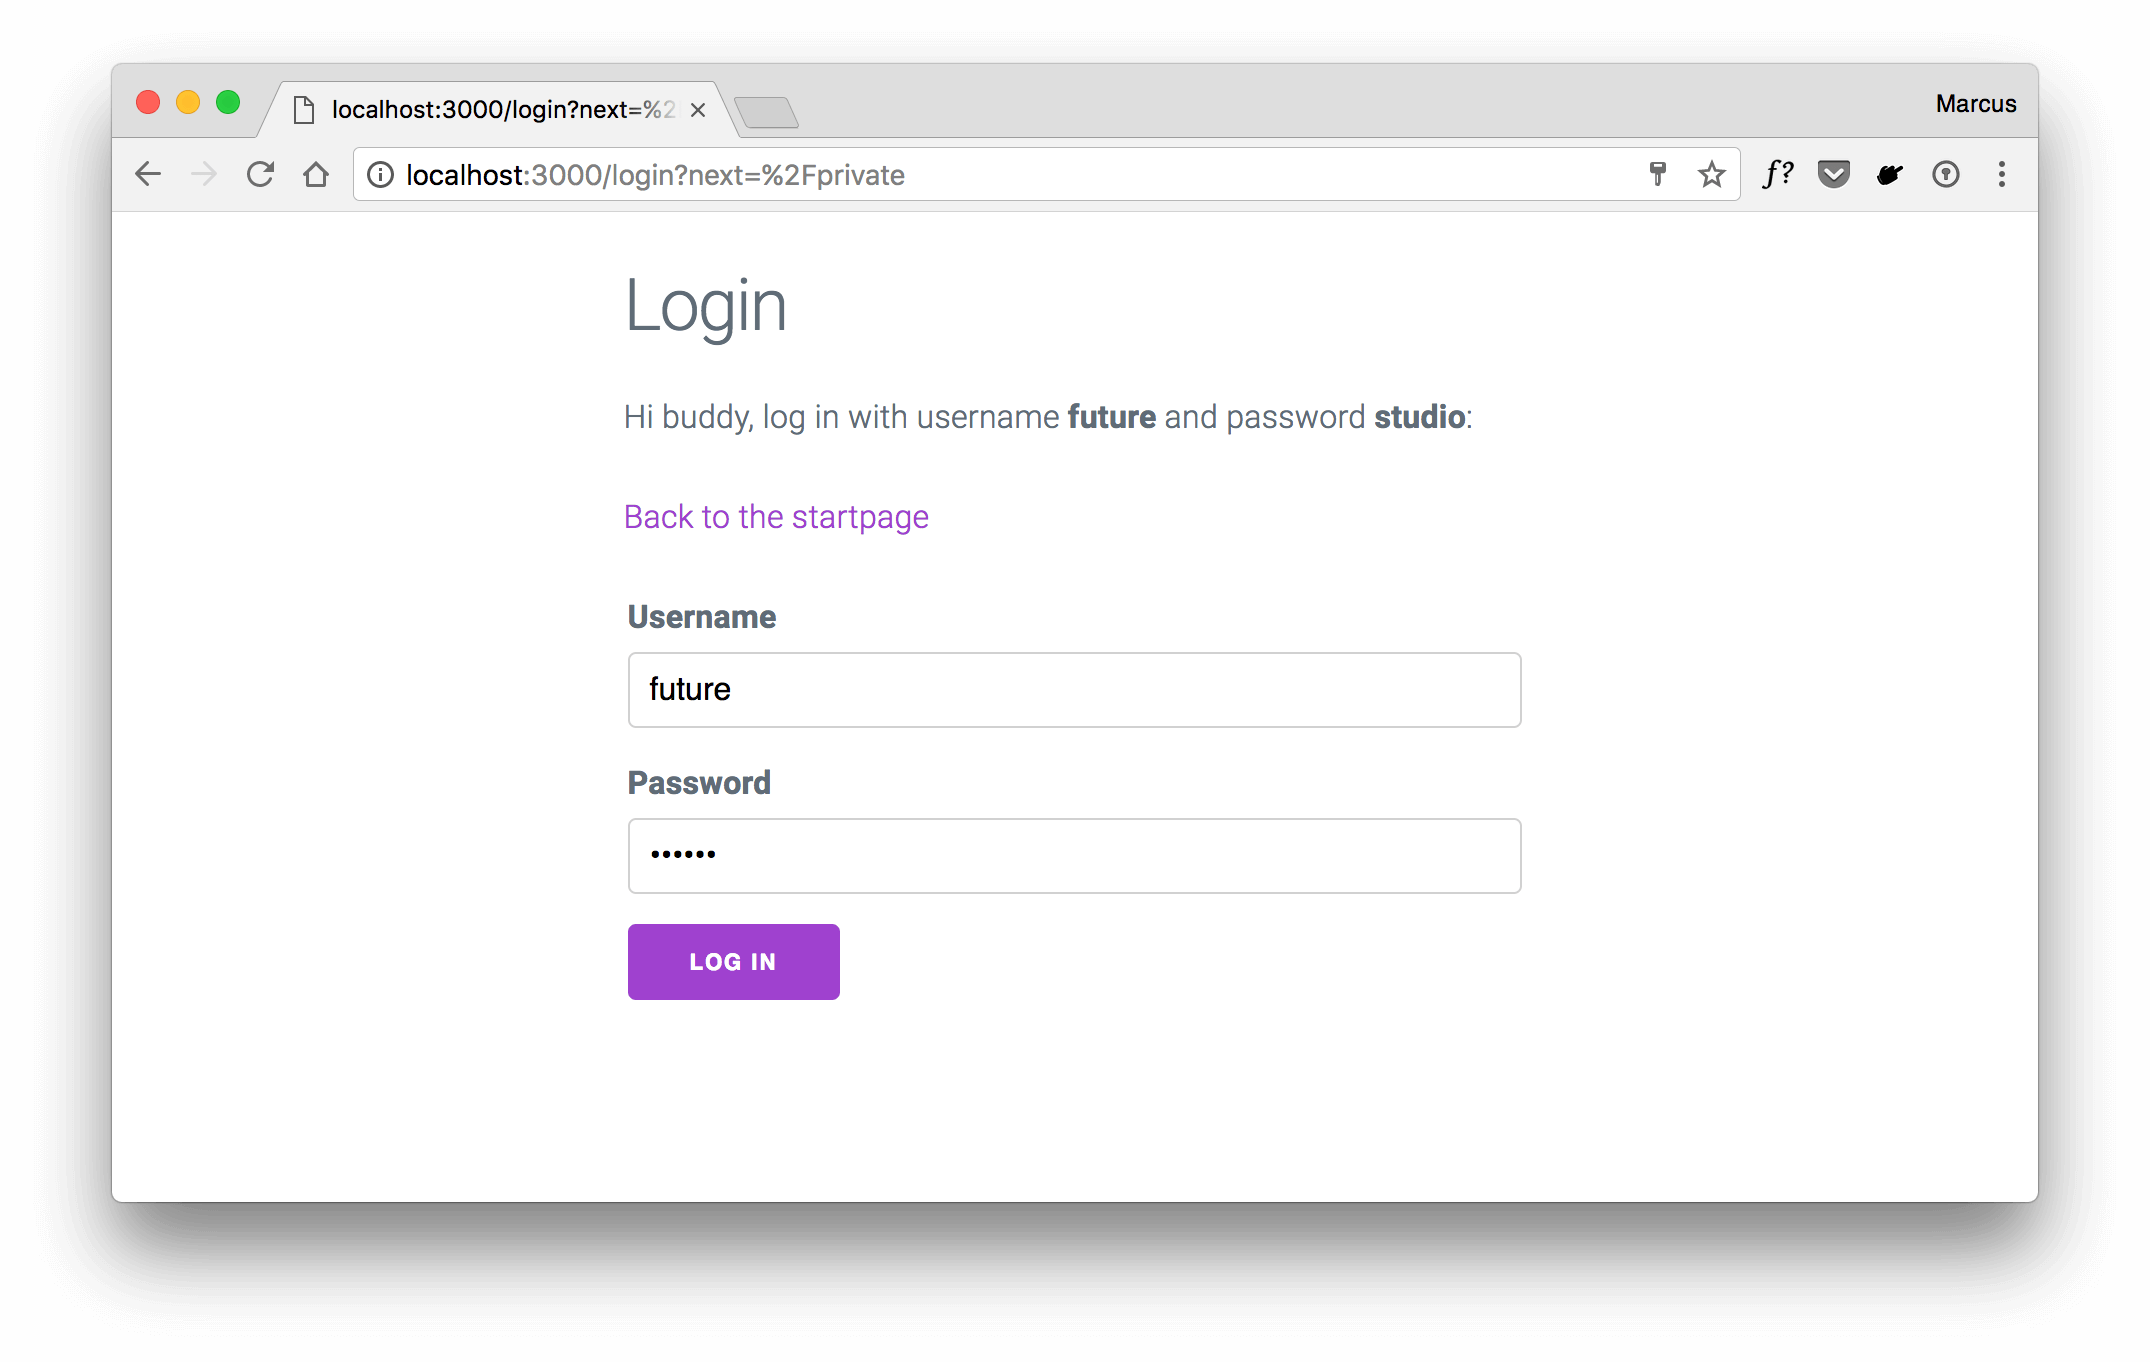
The question is: how does the app show the login screen and still keep the selected link for a later redirect? Well, read the next section to get the insights!
Configure hapi-auth-cookie to Remember the Selected URL
Authentication in hapi is based on strategies. This tutorial uses cookie-based sessions to authenticate users. With hapi-auth-cookie you can customize various configurations.
To remember a selected URL while showing a login screen, you need to specify two options: redirectTo and appendNext.
In case there’s no existing cookie or the cookie data can’t be validated correctly, the user will be redirected to a specified page, defined by redirectTo. This option requires a relative URL path as its value, like /login.
Enable the appendNext property (boolean) by setting it to true. This option requires redirectTo to be set as well.
The following code snippet illustrates the configuration for your authentication strategy that’s based on hapi-auth-cookie:
/**
 * Register session based auth strategy to store
 * and validate the session cookie received with
 * the user’s requests
 */
server.auth.strategy('session', 'cookie', {
  password: 'ThisIsASecretPasswordForTheAuthCookie',
  redirectTo: '/login',
  // appends the current URL to the query param "next"
  // Set to a string to use a different query param name

  appendNext: true,  // <-- the important line :)

  isSecure: process.env.NODE_ENV === 'production',
  validateFunc: async (request, session) => {
    // validate the existing session
    const username = session.username

    // find the user with given username (or other data)
    // in your database
    const user = await User.findOne(…)

    if (!user) {
      return { isValid: false }
    }

    return { isValid: true, credentials: user }
  }
})
This strategy configuration allows you to specify session for authentication on individual routes. Visiting the routes that require the session strategy will use the configuration from above.
Routes That Require Authentication
Set the session strategy for routes that require authentication and hapi will handle the validation process. For invalid session cookies, the user will be redirected to the login page.
const routeConfig = {
  method: 'GET',
  path: '/private',
  options: {
    auth: 'session',
    handler: (request, h) => {
      return h.view('private')
    }
  }
}
If you’re running into the „unknown authentication strategy“ error, follow this guide that shows you how to fix it.
Alright, at this point you have the authentication strategy properly configured and a route that requires authentication. Now it’s time to implement the actual login and use the URL within the next query parameter to redirect the user.
Implement the Login Handler That Redirects to the Previous Page
The following code snippet illustrates the route config that is called for incoming POST requests to do the actual user login. The auth object specifies the try mode for session to check for an existing session cookie, but don’t require a valid one. Within plugins you need to override the default redirectTo configuration to avoid an infinite redirect loop to /login.
Within the handler, check if the user is already authenticated and if yes, immediately redirect to the URL that’s available within the next query parameter.
In case the user isn’t already authenticated, do the actual database lookup for the input data.
Notice that you should apply payload validation for incoming user data. This tutorial skips the payload validation to reduce the amount of code and aim the main focus of a redirect.
const loginRouteConfig = {
  auth: {
    mode: 'try',
    strategy: 'session'
  },
  plugins: {
    'hapi-auth-cookie': {
      redirectTo: false
    }
  },
  handler: async (request, h) => {
    if (request.auth.isAuthenticated) {
      return h.redirect(request.query.next)
    }

    const username = request.payload.username
    const user = // find user in DB

    if (!user) {
      // no user found with given username
      return h.view('login', {
        username,
        errormessage: 'No user registered with given username'
      }).code(404)
    }

    const password = request.payload.password

    const isValid = await Bcrypt.compare(password, user.password)

    if (isValid) {
      request.cookieAuth.set(user)

      // redirect the user to the previous page
      return h.redirect(request.query.next)
    }

    // given password doesn’t match the stored one
    return h.view('login', {
      username,
      errormessage: 'Your password is wrong'
    }).code(401)
  }
}
The route handler simplifies the database lookup for a given user. You’d need to complete this part with your personal implementation. To compare the passwords, we recommend bcrypt.
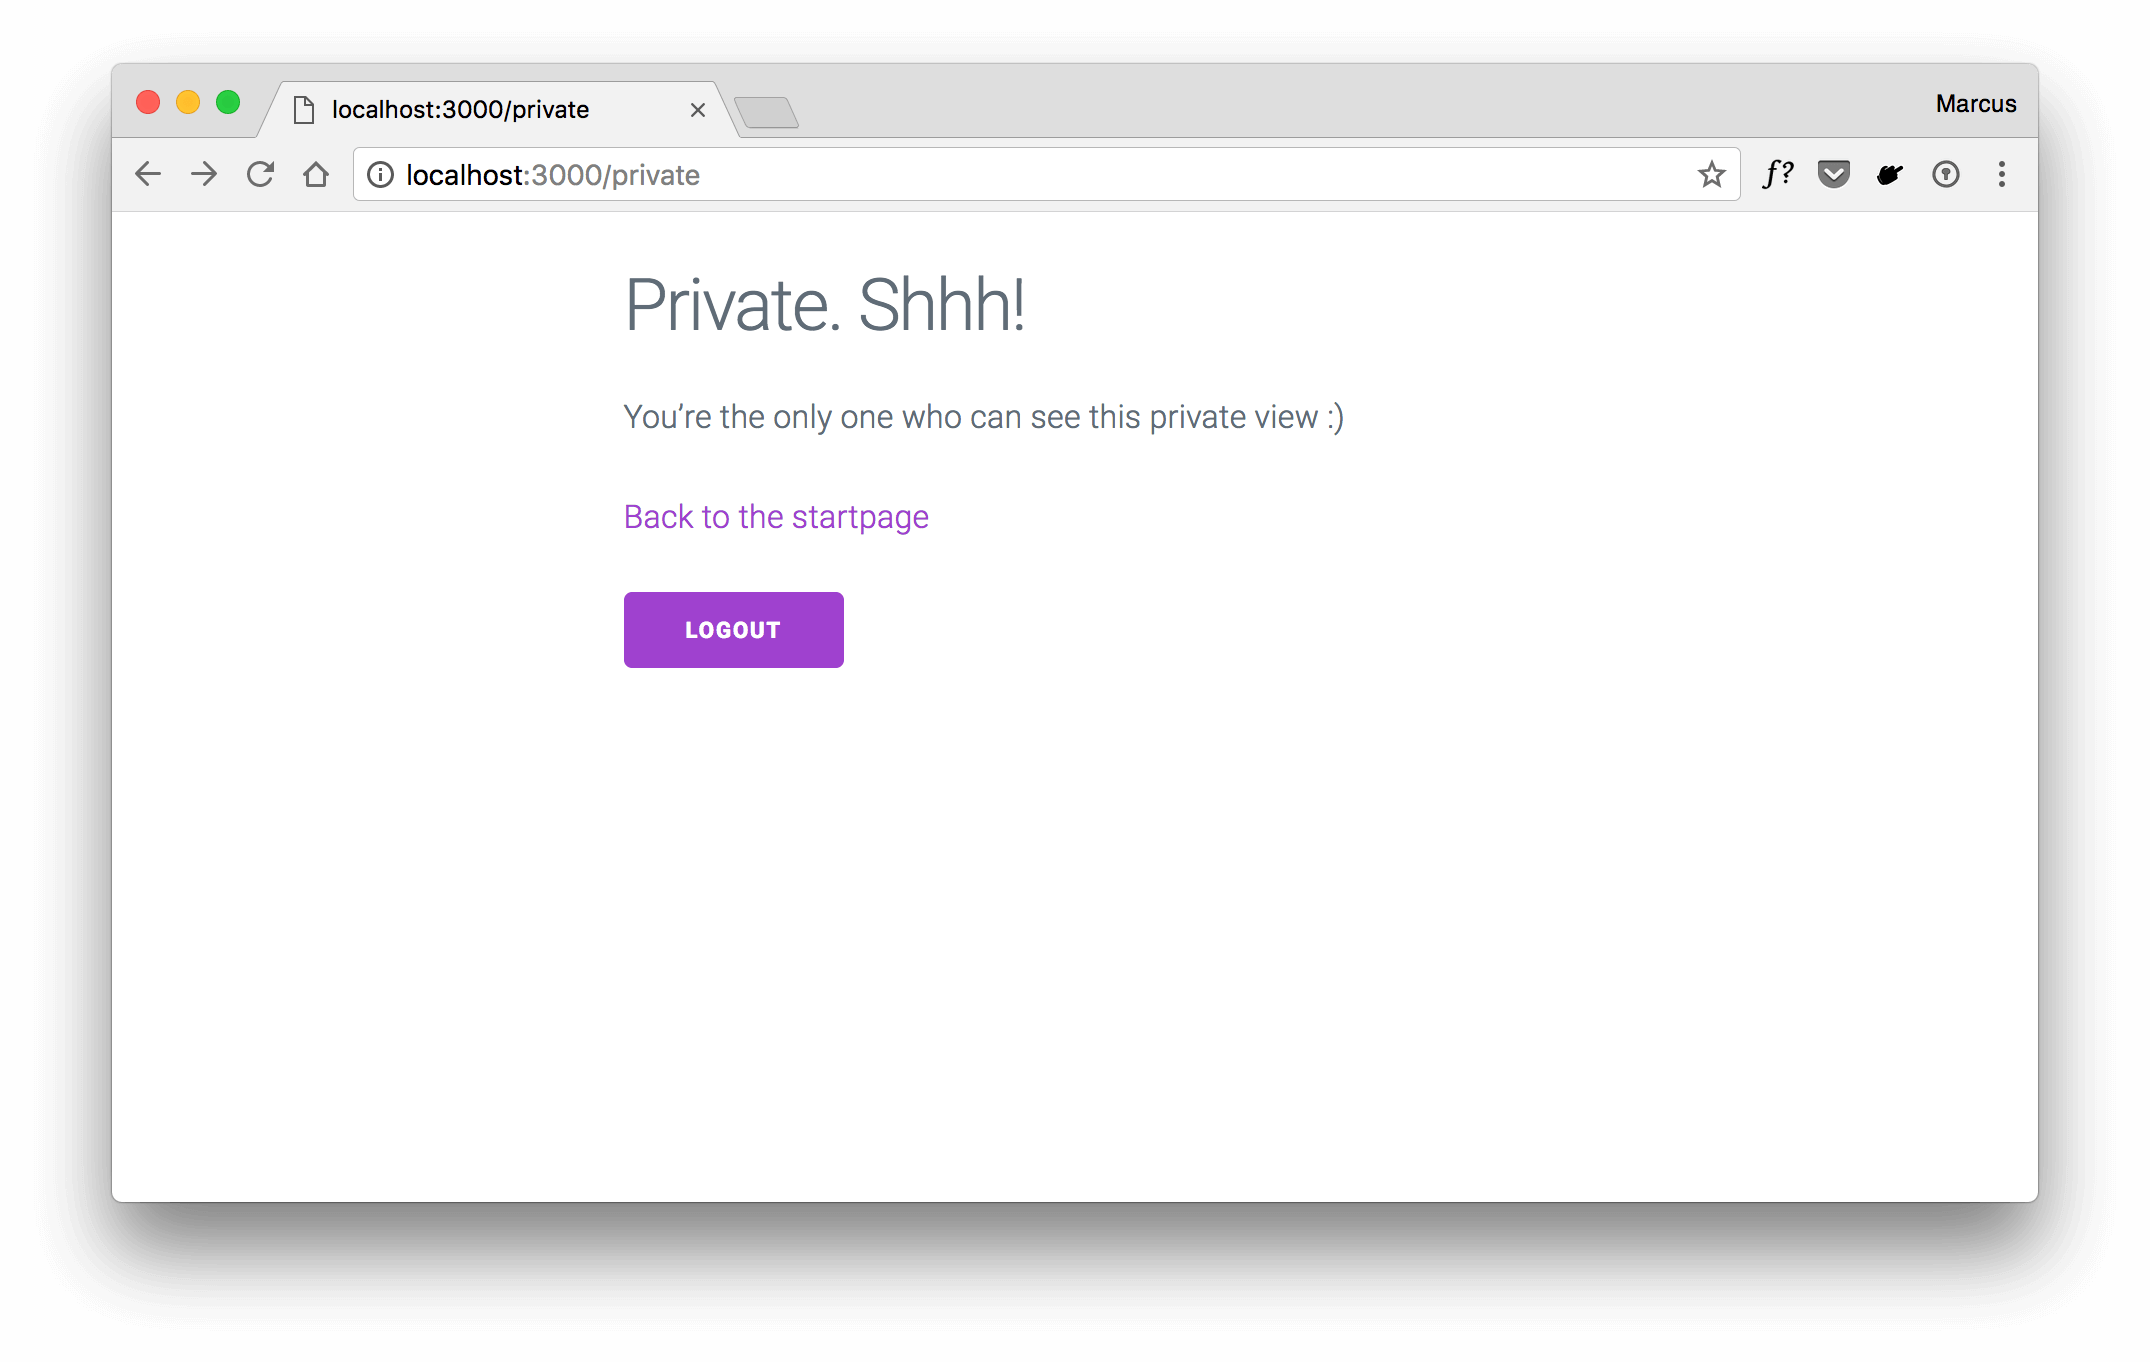
Finally, if all checks and comparisons pass successfully, use hapi’s reply.redirect(<url>) method to send the user to the actually requested page. The relative path to that URL is stored within the next query parameter and therefore available using request.query.next.
Notice: a user may manually remove the next query parameter from the browser’s URL and visit /login directly. That will result in a situation where next = undefined. Handle that situation with a default value for next to not run into a reply.redirect(undefined).
To check whether the next query parameter contains an actual value other than undefined, you can extend your could with an additional check:
// check whether there’s a value for "next" query param
// if not, define the default "/"
const next = request.query.next ? request.query.next : '/'

// redirect the user to the previous page
return reply.redirect(next)
How to Keep the Previous Page URL for Login Errors
Validation errors, forgotten email addresses, usernames, or passwords will raise errors that you need to handle and present properly to the user. When users need more than a single attempt to log in, you still want to remember the previous URL.
Actually, it’s kind of straight forward. The approach we’re using is to avoid the action attribute for the <form> tag completely. This way, the current URL from the browser’s URL bar will be taken as the request’s destination when submitting the form.
<form method="POST">
    <fieldset>
        <label for="username">Username</label>
        <input type="text" name="username" title="Username" id="username" value="{{username}}">

        <label for="password">Password</label>
        <input type="password" name="password" title="Password" id="password">

        <input class="button-primary" type="submit" value="Log in">
    </fieldset>
</form>
Even though there may occur errors during the login process, the hapi server will respond the login view again and you’ll return to the exact same URL as before.
The Result
Depending which link the user selected on the startpage or manually added for the next parameter within the URL, your route handler will redirect it to that page after successful login.
In future requests, the cookie-based session will be validated with the used strategy’s validateFunc for session. Make sure to provide a proper user lookup to authenticate each request.
Outlook
This tutorial shows you how to implement the functionality to redirect users after login to the previously requested page. Those features are convenient to bring users back into context when hitting them with a login wall for pages that require authentication.
When using the hapi-auth-cookie plugin, you’ve already the largest part in place. Update your existing login handler with little effort and users will love it :)
We’re happy to hear your thoughts and comments. Please don’t hesitate to use the comments below or find us on Twitter @futurestud_io. Let us know what you think!
Enjoy coding & make it rock!